There are three main pen types to do brush lettering. Felt tip brush pens, fude pens and actual bristled brushes. If you want to get into brush lettering I recommend trying all of them. I tried to think of the most cost-effective way to get a good grasp of the different types, without having to spend tons of money. So this is what I’d put on your shopping list for the very first trip to get lettering supplies. I did make a product choice, but this guide will show you a variety of alternatives too. Total cost of my list is around 15 CHF (which is roughly $15)

Why you should get all different types of brush lettering tools
Why you should get all different types of brush lettering toolsWhen I first started Brush Lettering I grabbed one of my nail art brushes and my old gouache palette. I tried that, fell in love and went out and spend a lot of money the next day on some lettering supplies. The supplies I got did not cover all types of brush lettering tools though. It took me a few months before I got my first fude pen, which might have been a mistake. I totally fell in love with real bristles the moment I first used a Pentel Aquash. I have read a lot of blogposts telling people to first get a Tombow Dual Brush Pen and then gradually move towards real bristles.
I think this is a mistake. (Personal opinion here)
Don’t get me wrong, I do love the Tombow Dual Brush pens. But, I still have a lot more trouble using them than a 00 brush. So I think it is a mistake to just try one kind of brush lettering tool, when there are clearly more options. Because naturally you will be better with one tool. Some people slay Tombow Dual Brush pens and suck with real brushes. Others can work those bristles and if they pick up a fude pen it looks horrific. I feel like we all have a favorite, and if you just try one thing, you might give up on learning brush lettering in general just because that one pen did not do what you wanted.
So I feel like if you want to get into brush lettering, your first trip to the art supply store, should consist of 5 tools. Only after trying all of the options can you get a grasp of what the tools are and if the whole thing is a hobby (or career) you want to pursue.
This is assuming you don’t own any art supplies. Okay, I suppose you own some paper, a cup and a plastic bag (those will not be part of the 5 tools)
The 5 tools you should get and why
The 5 tools you should get and whyHere is the list of Tools you should buy.
- 1 x Fude Pen
- 1 x Brush Pen (felt) filled with water-based ink in Cyan
- 1 x Brush Pen (felt) filled with water-based ink in Magenta
- 1 x Brush Pen (felt) filled with water-based ink in Yellow
- 1 x Brush (Size no. 4)
1 Fude Pen
1 Fude PenFude pens are small brush pens. The tip is one mass, so there aren’t any bristles. The tip is usually very sturdy, so it won’t bend and break or fray easily. If might warp a little bit, but this should not affect the way the pen writes. Fude pens are actually meant for note taking in asian characters, so that you can achieve the different line weights which are needed for that (I don’t speak or write any asian language, so I don’t know if the weight is actually necessary, but the pens are asian and used for note taking, that’s what I know for sure), but they have been discovered by artists and letterers for their awesome character.
A fude pen will allow you to letter in a pretty small size (about 1cm height). There are different pens out there, some more on the soft wet side, others more hard and dry. They also have different sizes and different ranges between the thickest possible and thinnest possible strokes.
I have tried a good variety of fude pens (13 different ones up to this point), out of the whole bunch I only disliked 2. One of them so much I gave it away to a friend because it just made me angry whenever I saw it (she likes it, otherwise I would’ve thrown it away), the other one is kept only to document how awful it is. I am going to tell you that it’s the Pilot Pocket Brush. The soft version has gone, the hard version sucks but is still here. Nothing against Pilot though, they make some of my favorite pens (The needle point gel pen in 0.25 - a DREAM!)
You can’t really go wrong with fude pens if you ask me, I still have a few recommendations for beginning a little later in this post.
You should get a fude pen because it gives you much smaller results than most other tools. Because the pens are so sturdy you are very unlikely to break them even if you will hold the pen wrong multiple times and press too hard or on weird angles. Which you are guaranteed to do as a beginner. Also it is probably the easiest tool to get the hang of, if you ask me (which why I still hate myself for not getting into these pens earlier).
3 Brush Pens (felt) with water based inks in cyan, magenta & yellow
3 Brush Pens (felt) with water based inks in cyan, magenta & yellowOkay, I am very specific about these brush pens for a reason. The 3 primary colors will actually be replacing the watercolor you would need for the last tool (which is a brush). This is also why you should use brush pens with water-based inks in them.
The felt tip brush pens are what most people recommend to beginners. The most popular one being the Tombow Dual Brush pen. Felt brush pens are like your normal felt tip pen, but the tip is round and pointy and it is meant to be bent, so it is not hard but flexible. I personally am not the biggest advocate of this pen type and will most definitely grab brushes and fude pens before felt brush pens. But brush pens usually come in a lot of different colors, while most fude pens only come in black. Because they have a much larger tip than a fude pen they allow for lettering in a larger size, which is better for building muscle memory and most of the time easier when getting started with lettering. And supposedly it is easier to handle one mass than multiple bristles (I might be the only one disagreeing here). Downside is that felt brush pens are very prone to fraying. You will break a lot of these before your lettering looks decent.
You should still get the brush pens because you are pretty likely to fall into the category, that adores brush pens. Also it is more versatile and cheaper to get a brush pen which you can use for your last tool than some water color or gouache pans. I recommend getting 3 because we can mix all colors from the 3 primary colors and this also gives you the opportunity to try multiple ones (since the tips of these kinds of pens come in much bigger variety than fude pens). So you could try 3 different brands at once.
1 No. 4 synthetic round brush
1 No. 4 synthetic round brushIf you follow me on instagram or know anything about my lettering you will know that I love my watercolors and 00 brushes (I have a lot of 00 brushes). I am one of those people that’s just drawn to brushes (even though I am not a painter) and I find them easier to handle. This is why I would recommend you try brushes. For lettering the round brushes are the best. Synthetic bristles are definitely easier than real hair brushes here, because synthetic hair springs back into the original shape, which is easier. The size I am recommending for beginning is the brush I started with. A no 4. If you go bigger you might go to large and not be able to fit all of the words onto a single page. If you go smaller, the movements are getting harder. I know I had trouble with going from a 4 to a 2, it took probably around 6 months of lettering before I was comfortable with a 00 brush. Obviously every brand has a bit of a different sizing, but most brands you get in art supply stores have a number 4 that’s somewhat around the size you should look into. I recommend you first get a normal brush and not a waterbrush, because waterbrushes are usually more expensive and if you are using the inks from the brush pens as your watercolor replacement, the possibility of having too much water on the bristles is (Obviously) quite high with a waterbrush.
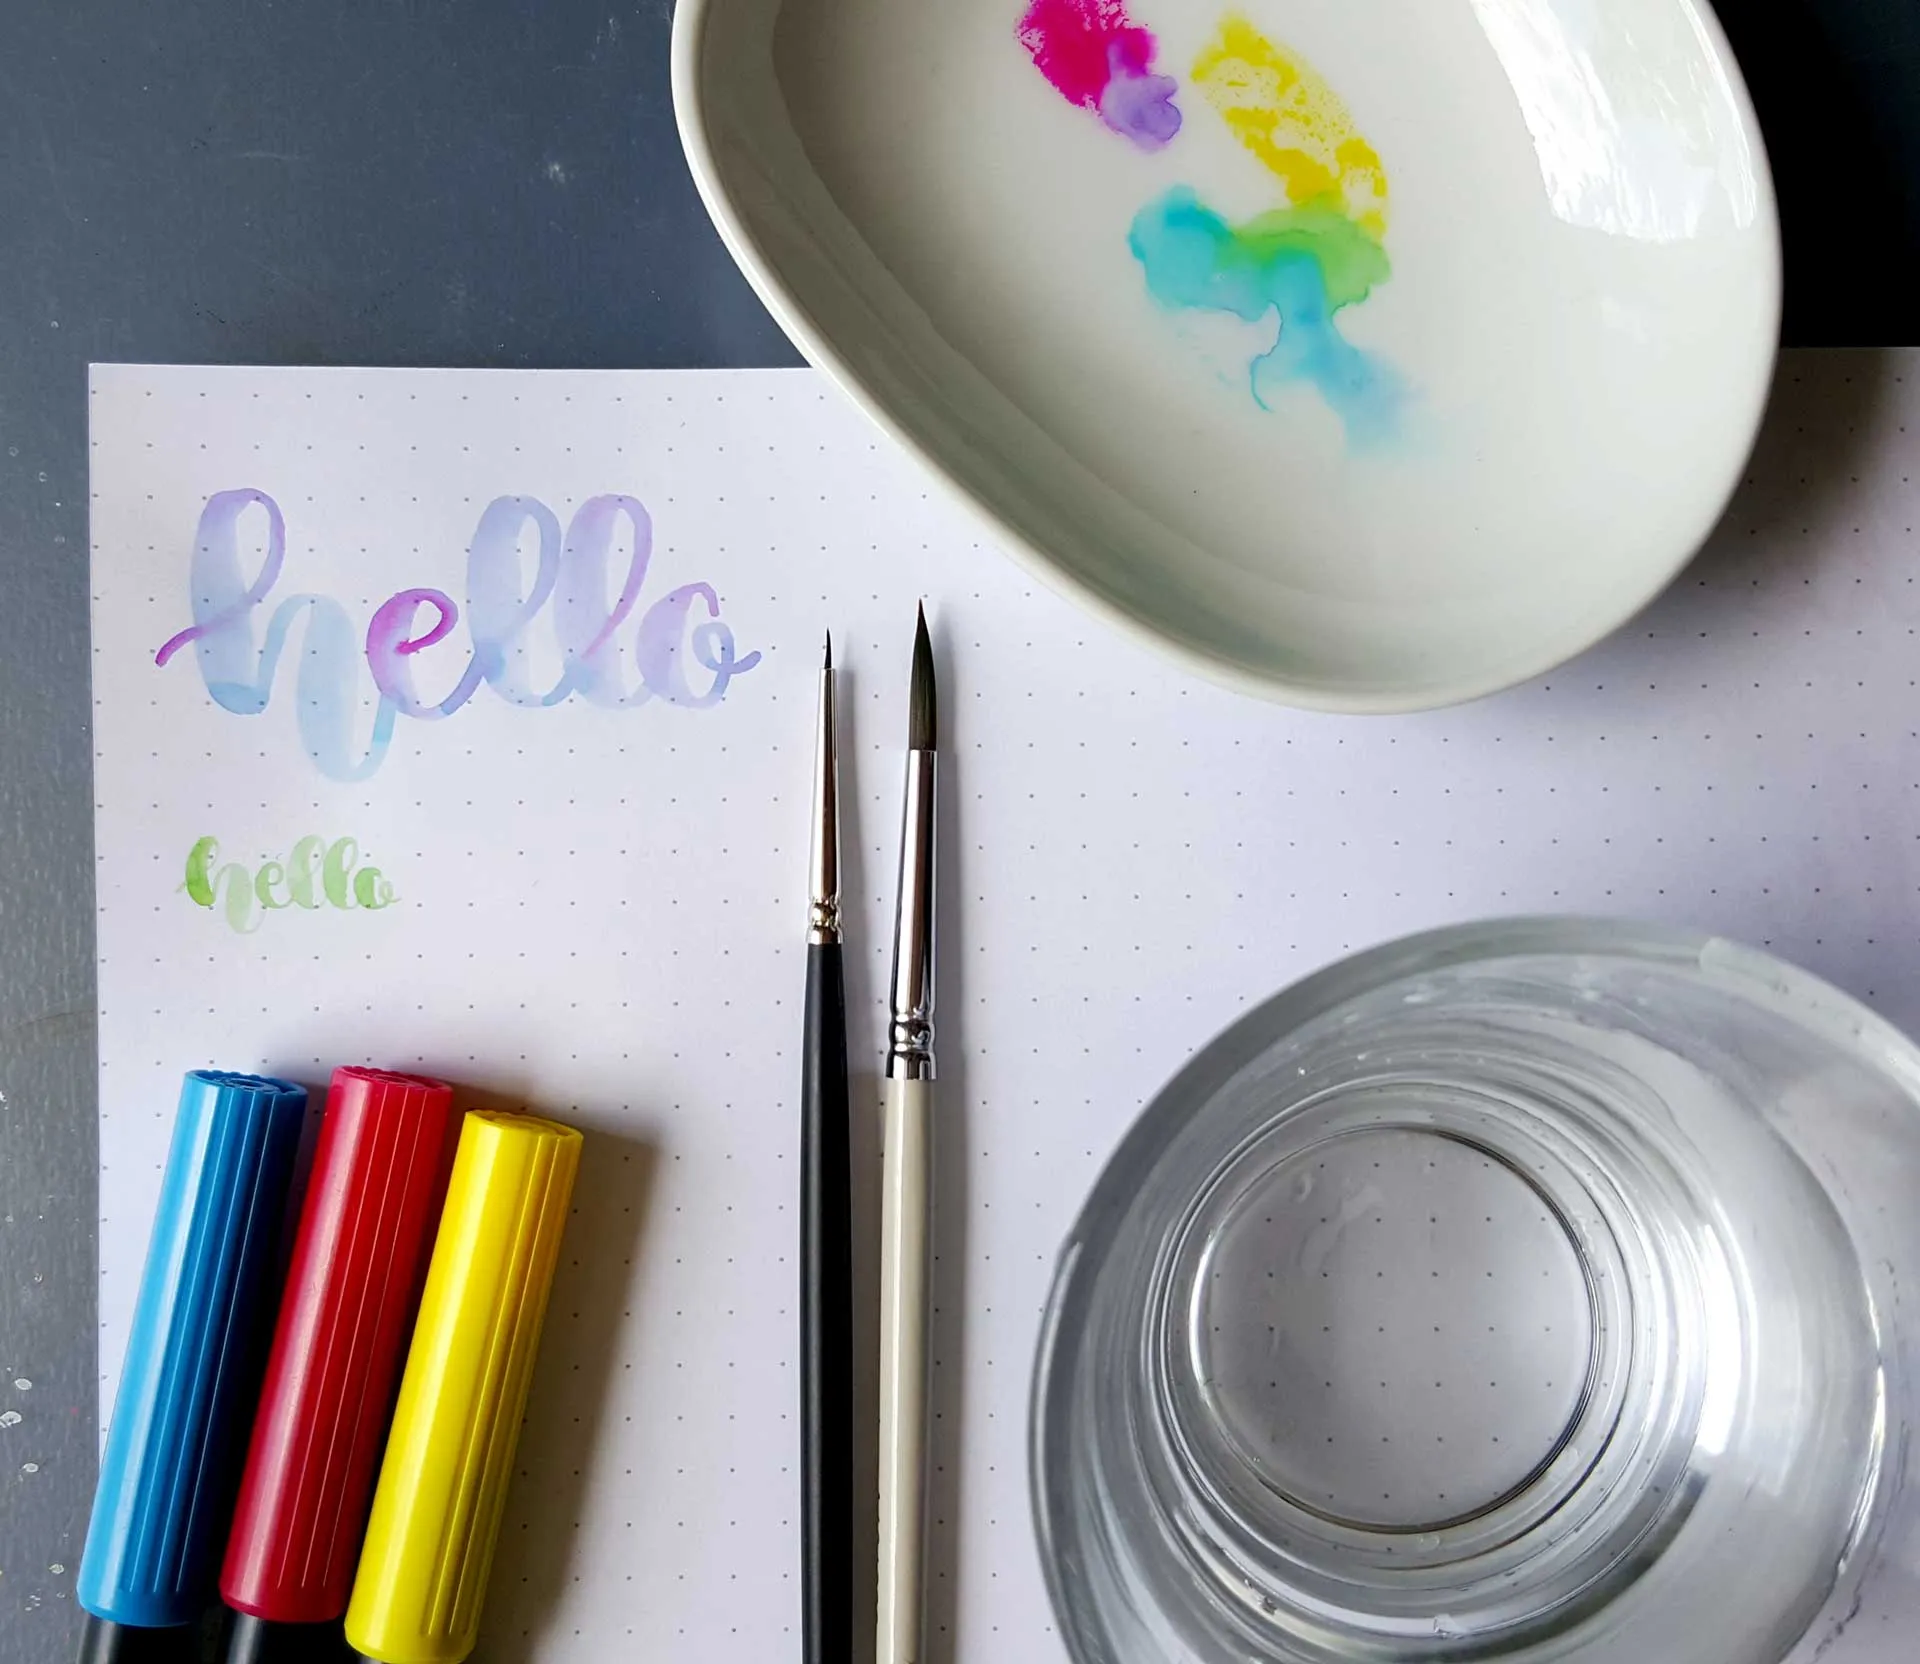
To use the brush you want to grab a small plate (or a plastic bag). Use your brush pens to draw some ink onto your slippery surface. You might need to dip your brush in a bit of water, depending on the inks your pens are filled with, so the paint is flouid enough to transfer onto the paper. Because you have all of the primary colors you can experiment with blending and are able to mix every color imaginable.
This concludes my list of supplies, let’s talk specifics.
Product recommendations
Product recommendationsFude Pens
Fude PensAs I said fude pens do come in different hardness levels. The first fude pen I ever tried was the pentel fude touch (also called pentel sign pen with brush tip). This is the brush version of the very popular sign pen (and not not be confused with that!). It is the only fude pen I know of that is available in different colors. I really like this fude pen because it is right in the middle. Not the softest, not the hardest. It has a nice contrast between thick and thin and I can find it in Switzerland (it was the only fude pen available until a few weeks ago). I think Pentel is one of the brands that’s available in a lot of countries so it might also be one that is easy to get your hands on. In Switzerland it costs 3.50 CHF. And it would be my first choice as a first fude pen.
I chose 6 alternative fude pens I want to talk about. All of the alternatives are pretty similar in size. I did rate them, so starting at the top would be my best recommendations up to fude pens which are most probably not the best for a first fude pen, but amazing nonetheless, so you can come back to this list once you’ve mastered the first one.
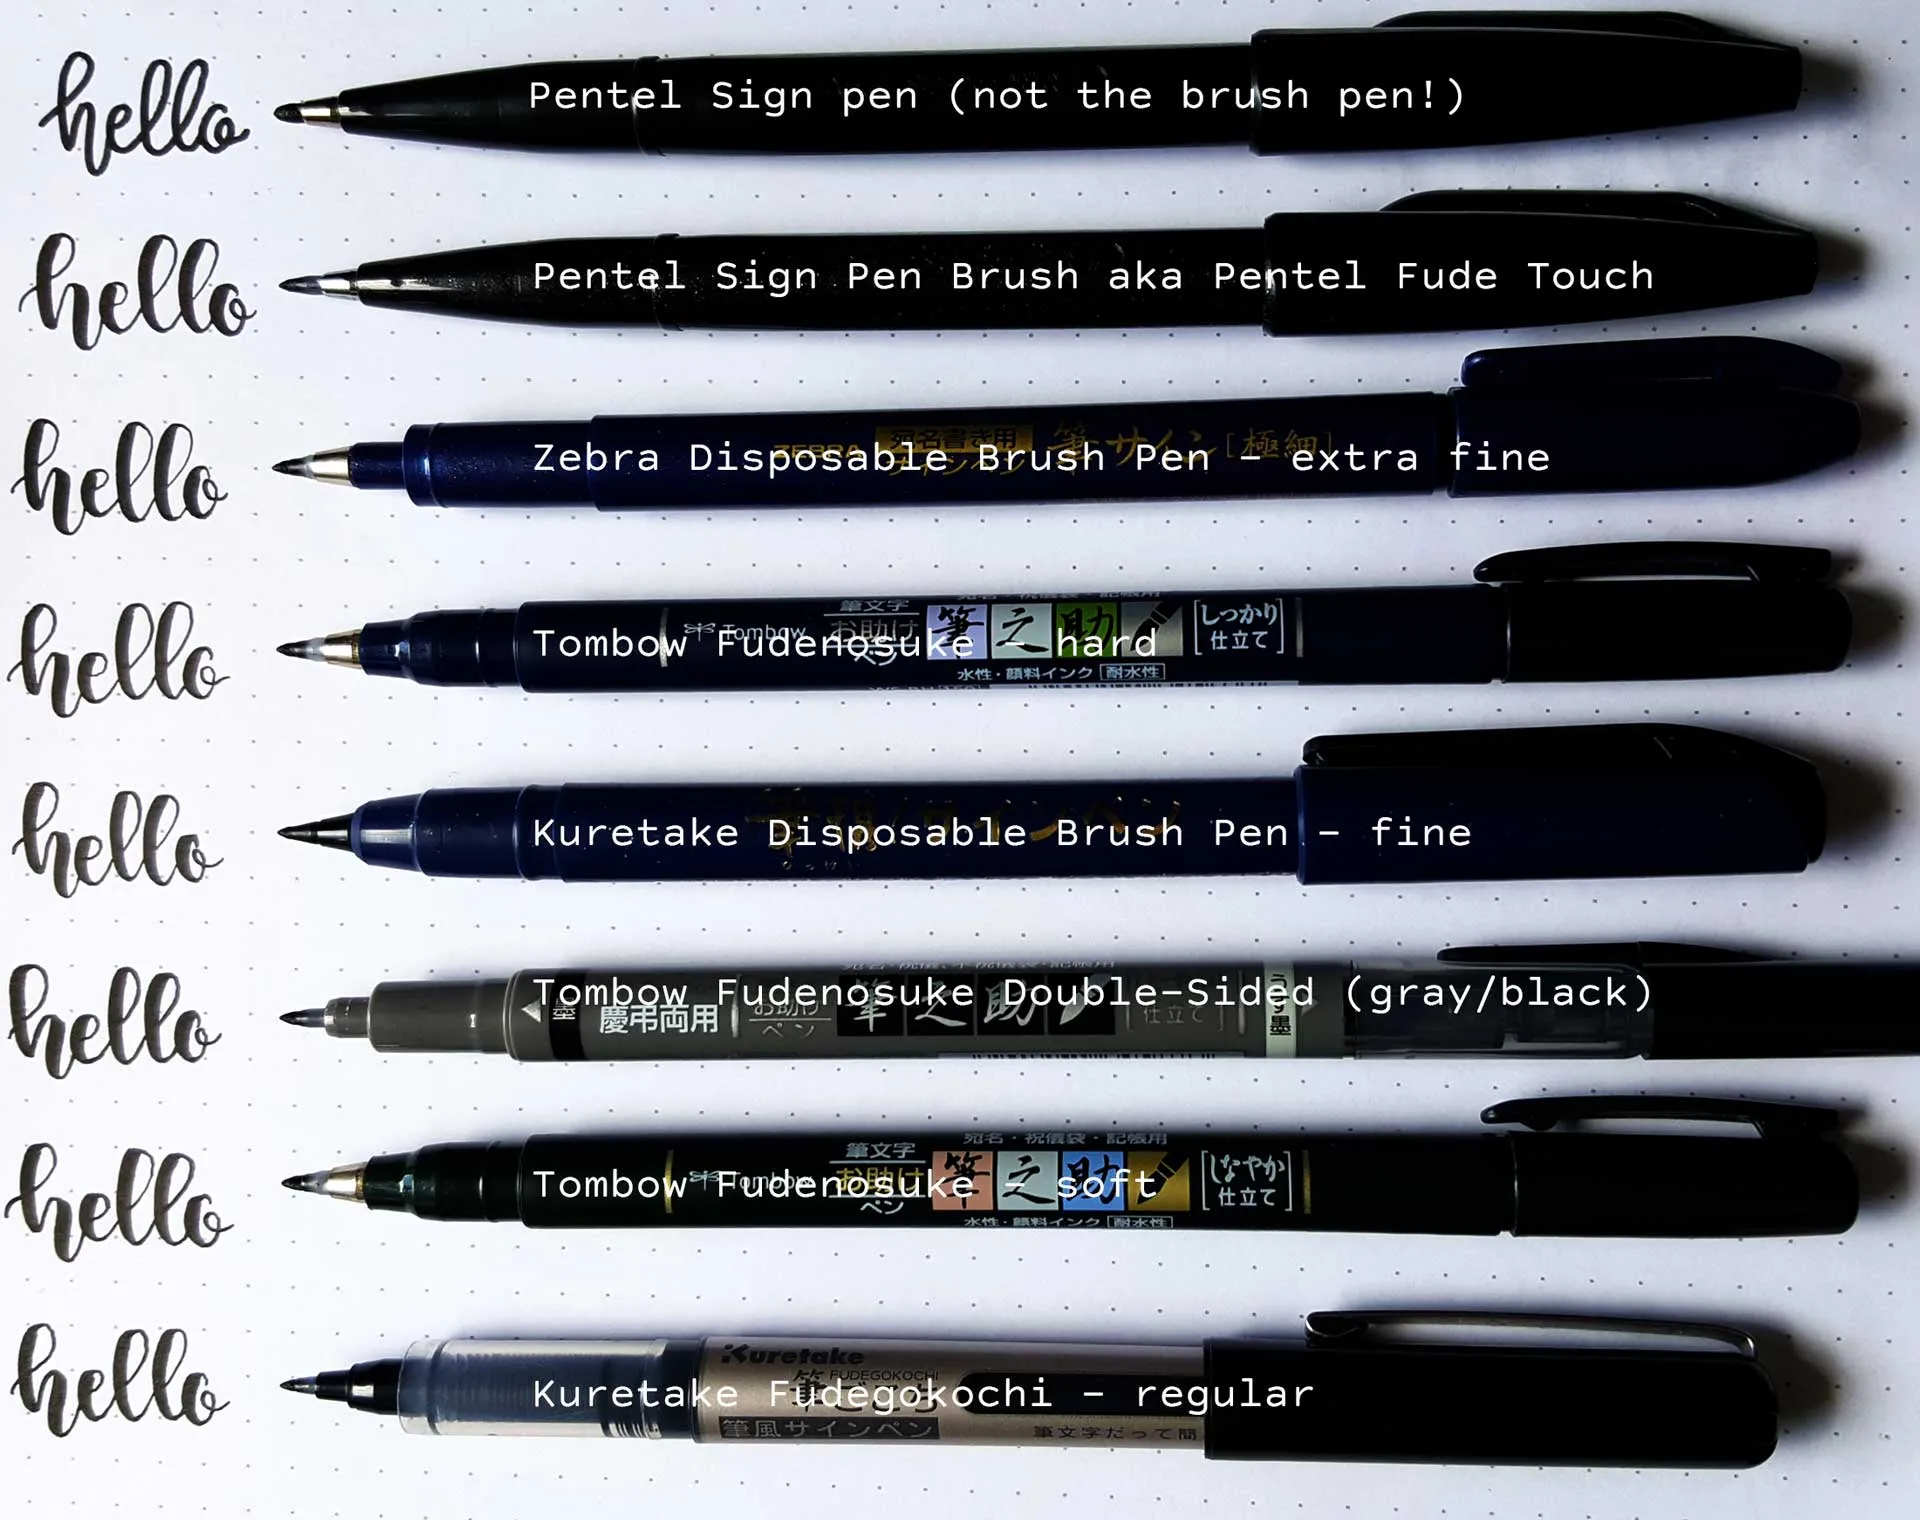
I ordered all of these at jetpens.com (apart from the pentel) and the names used are the ones from the site.
Pentel Sign As mentioned above, this is my first pen. It is right in between everything. Medium flexibility, medium flow. And available in different colors! Zebra Extra Fine We can’t find this pen in Switzerland, I ordered it on jetpens.com (decent shipping prices to Switzerland) This pen is fairly hard and dry. That’s what I would recommend to go for, since it is easier to handle. Minimal pressure changes don’t affect the pen as much, so you will get more of a consistent look. I chose this one over the Tombow Fude because the tip is a little bit bigger, which makes it a bit easier to handle if you ask me. Tombow Fude hard Very similar to the Zebra Brush Pen, just a little bit smaller. One of the most popular fude pens, and now finally available in Switzerland. Kuretake Fine Amongst the first brush pens I tried. The tip is a bit shorter than most other fude pens, but it works beautifully. Maybe a bit dryer than the Pentel, but otherwise very similar. A nice medium tip in terms of flexibility. Tombow Fude Double This is another lesser known Tombow Fudenosuke. This one is double sided. It has a gray and a black tip. I would not recommend this as a first fude pen, as it might be a little too soft. It is definitely softer than the hard tip. A little firmer than the next one, though. Tombow Fude soft This is my favorite fude pen. It is now available in Switzerland, which is great. In case I run out of my 4 backups. I love this pen, but I’ve only grown to like it. It was not an instant love story. THis is why I would not start with this pen. It is very soft, medium in the flow. But minimal pressure changes will affect your line. Better to first get the hang of that, before diving into this amazing pen. Kuretake Fudegokochi regular I think if I got this pen when I first started I would’ve despised it. It is super wet and super soft. In a good way though. This pen is everything I wanted the pilot pocket brush in hard to be. But you need to have control over your pressure. Control you learned from using other pens. I’d call this the advanced fude pen, so don’t start with it, but consider getting it a little later in your journey.
Brush Pens
Brush PensTombow Dual Brush Pens are crazy expensive here. They start at 4.7 CHF and reach all the way to 6.50 CHF in stores, which is crazy. Especially since you are guaranteed to break your first dual brush pen within the first hour of using it. They are $2.5 on jetpens, so if they were this price in Switzerland, these would be my first choice too, but they are not. My first choice though is actually a new discovery but an instant love. I don’t know how available they are internationally (apparently they are not on amazon.com but on amazon UK there should be a shop that ships to the US, otherwise check out the store locator on talens.com), but I totally fell in Love with the Ecoline Brush pens. They cost 3.2 CHF here. I feel like the Ecoline Pens have a tip that’s a bit more sturdy but it is definitely softer than the Tombow and a bit smaller. I really like how they feel and the Ecoline highly concentrated watercolor is amazing for using with brushes. That’s the exact thing the pens are inked up with. So they are the perfect pen to use as watercolor replacement, because they are actually watercolor pens. They will transfer a lot wetter than a tombow on a plastic bag or plate. So for brush use you might not even have to dip the pen in water.
We are talking water based brush pens here, so the Faber Castell Pitt Artist Pens, which are also quite popular are not eligible for this list, since they are permanent, thus they can’t replace watercolors.
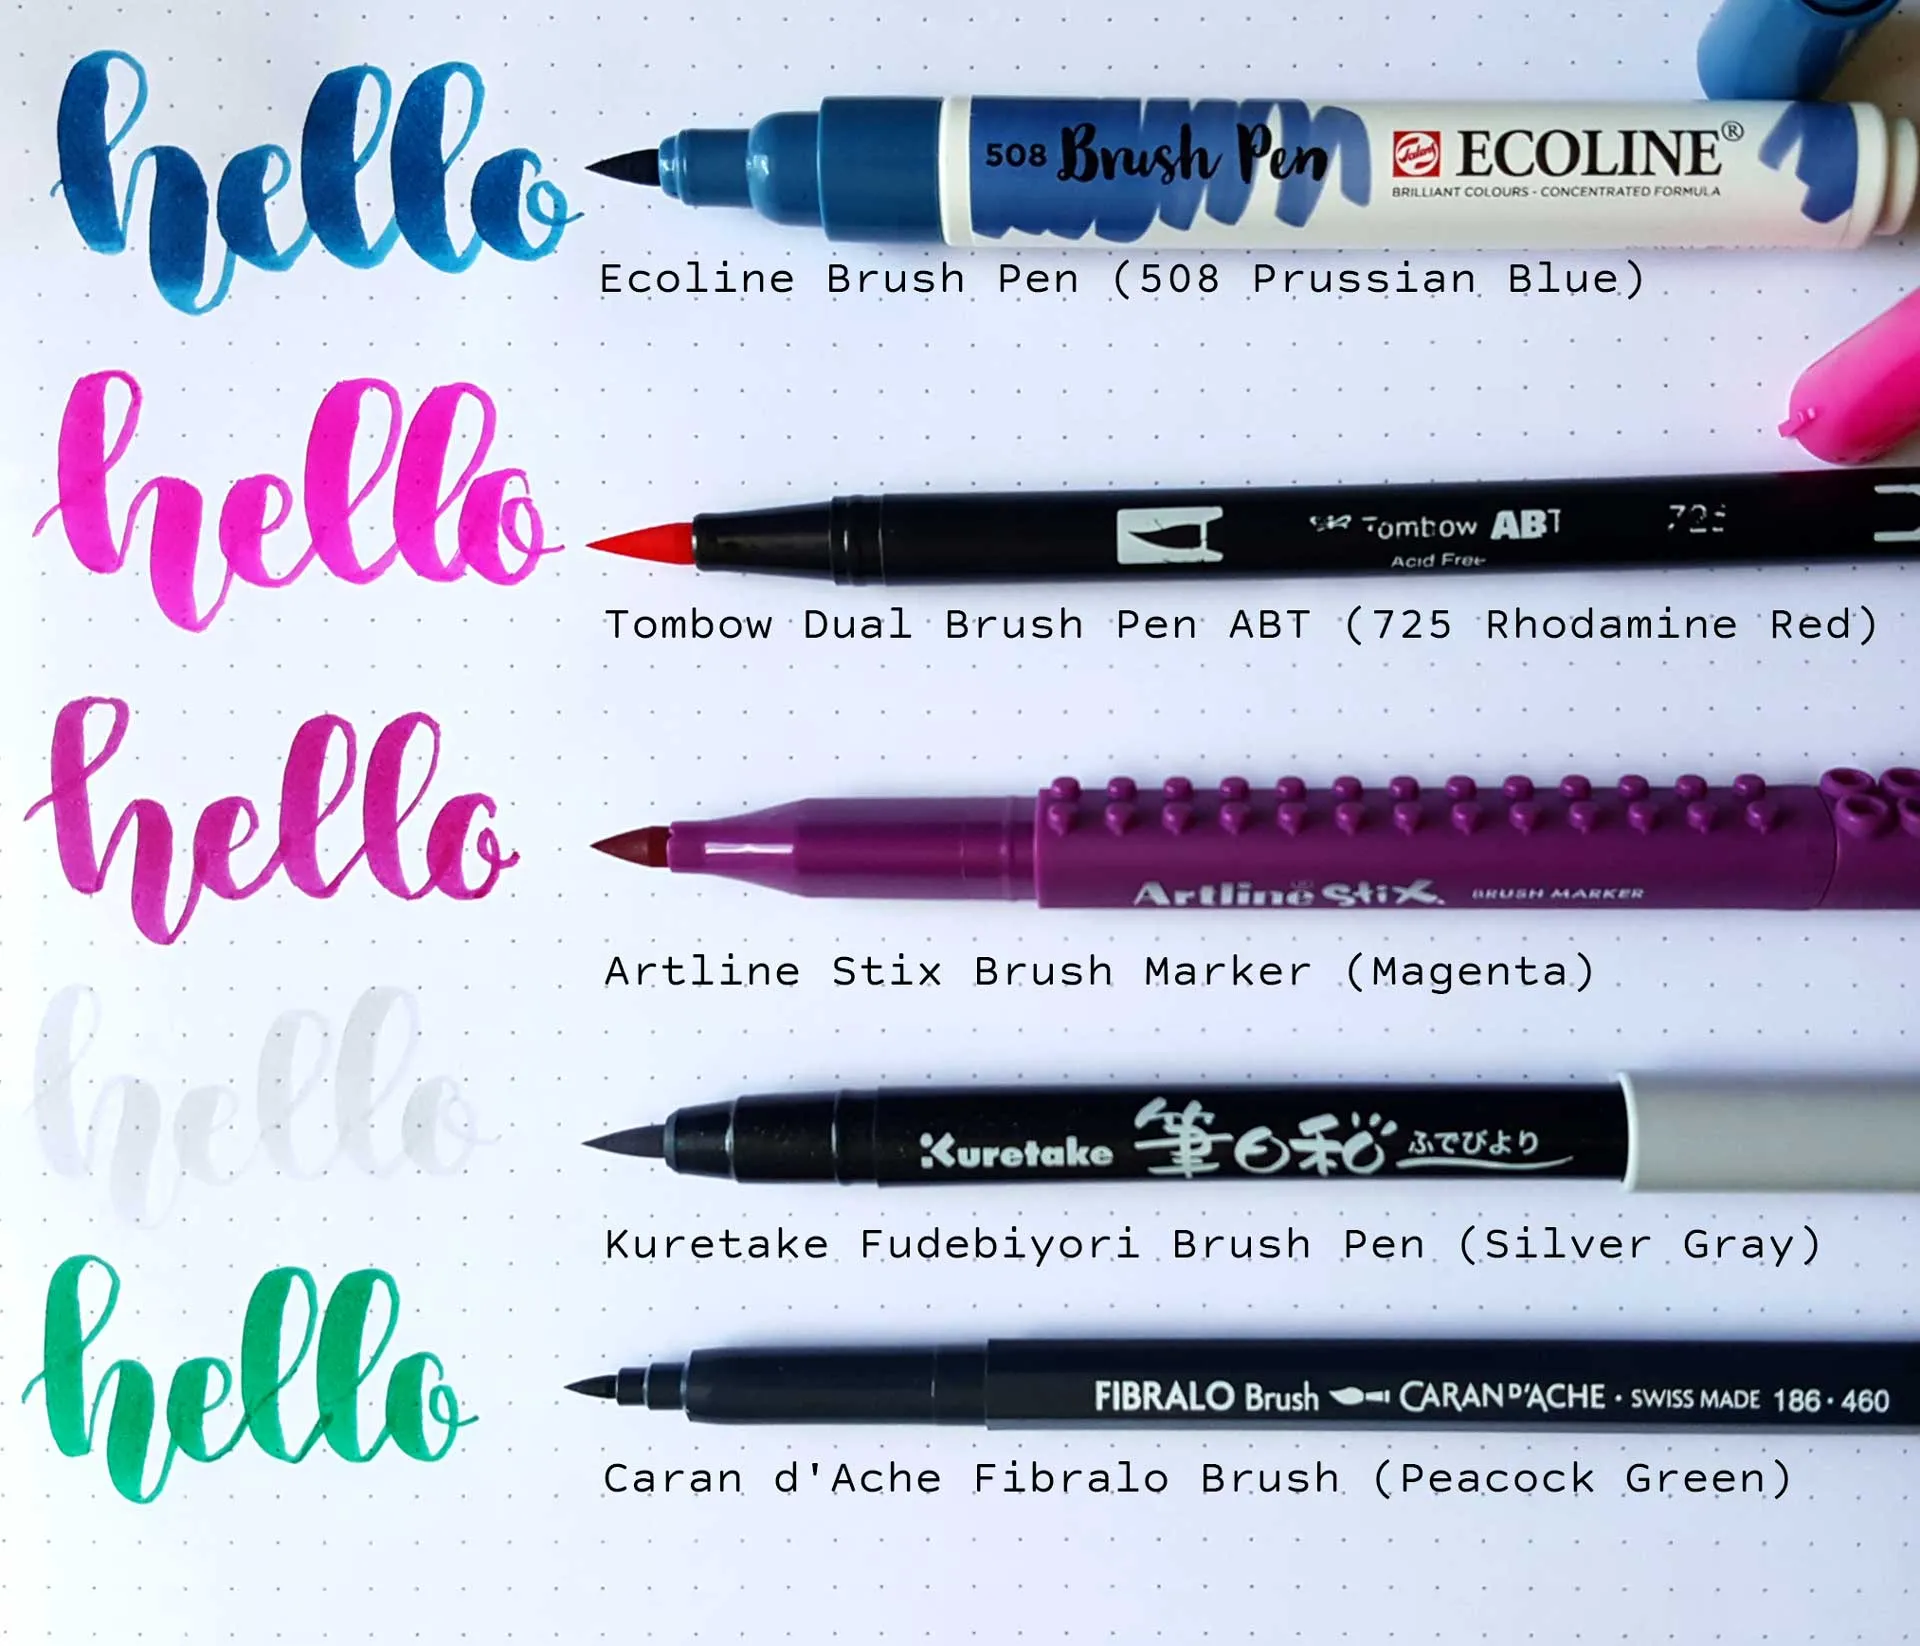
I have a variety of brush pens demonstrated below. The Artline Stix are only available in Sets though, so you can’t really just get the primary colors. I don’t have the full range of the Kuretake Brush Pens, so I have not figured out the colors which are closest to primary. And the Caran d’Ache are also only in sets for the rest of the world (I did find a swiss online store that has them in singles, but unsure how the shipping policy is). But both Artline and Caran d’Ache are great, so I added them to the list. For the Tombows and Ecoline which both are available individually, I put together the exact pens I recommend.
Tombow and Ecoline Primary Colored Pens
Tombow and Ecoline Primary Colored PensFor Ecoline this was really easy. They name their pens nicely. And I got them in a set of 5 with a green and black marker (if you have a bit more to spend, that set is fantastic!)
- Cyan - 578 Sky Blue (cyan)
- Magenta - 337 Magenta
- Yellow - 205 Lemon Yellow
Tombow doesn’t have classic names, like Ecoline. So luckily I did find some fairly close matches in my rather small (I mean 17/96, so many more to get!) collection that I’d consider pretty true primary colors. So in Tombow your Cyan Magenta and Yellow would be:
- Cyan - 493 reflexblue
- Magenta - 755 rubinered
- Yellow - 055 processyellow
Okay, now for the image and a bit more on the pens:
Not gonna talk more about Ecoline and Tombow, I think I said it all.
Artline Stix I was really really surprised when I accidentally ran into these in my very small art supply store in the city I study. These pens are so much fun! they are triangle shaped and remind me of lego. Yes, they do clip together (is that correct english?). The tip on these pens is quite sturdy and hard. So you can’t achieve a contrast as high as with the Ecoline and Tombow, but I think these are great for beginning. Also really inexpensive. I think if you divide the price I payed, one pen was around 1 CHF. Kuretake I only got this one color but it’s great. I’d say it has a very similar tip to the tombow but it is a little shorter, I’d say it’s a bit easier to handle than a Tombow for that reason. BUt it will give you less maximum width you can achieve. Caran d’Ache I always owned Fibralo Pens. Used them as a kid in my coloring book. Recently Caran d’Ache came out with w brush tipped version of the pens and after eyeing them for weeks and telling myself I don’t need more pens I caved in. I’ve had them for very few days but I am in love. The colors are super vibrant and I like how small yet precise the tip is. I’d say it is similar to a Faber Castell Pitt if you know that, but since it’s a bit shorter writing is easier.
Brushes
BrushesIt doesn’t really matter what brand you get. I am honest here. It is really not that big of a deal if you get a super cheap brush or a super expensive one. The more expensive ones might have a finer point, but in the beginning you will struggle with hairlines anyways and be more heavy-handed. You would not be able to do that with the most expensive brush either. I would totally get one of the cheapest brushes you can. If you take good care of it (clean it after use, don’t let it dry with the bristles up) it should last you long enough. I’ve had brushes for years without them breaking.
If you decide brushes are your jam, you can definitely upgrade, but to begin with you should totally not spend a ton of money on this, since it is quite likely you might not want to dive into brushes at first. Most people (are not like me and) will first learn lettering with other tools and then revisit brushes.
How to go on from that
How to go on from thatSo that is your basic starter kit. I recommend you get that and use it for a while. If you like the lettering thing it is very probable that you will like one of the three types best.
If you like the brush pens best you basically got a whole world of pens to go through. There are soooo many different kinds of brush pens out there, you will be able to keep busy for a while.
If you like the fude pens I would definitely invest in some more. And if you are really into that size I would also look into some pointed pen lettering because it might really appeal to you.
If you fall in love with the brush, I would definitely get some real paints first. Either Gouache (highly pigmented watercolor), watercolor or inks (like the one you could also use for dip pens). Also while at this check out waterbrushes (the ones from Pentel are my favorite) and check out different brush sizes too.
Obviously if you like all of them the world is your oyster. I have a huge variety of pens and paints. You are definitely more likely to run out of money than new lettering tools you could buy, I talk from experience.
Honorable Mention: Crayola
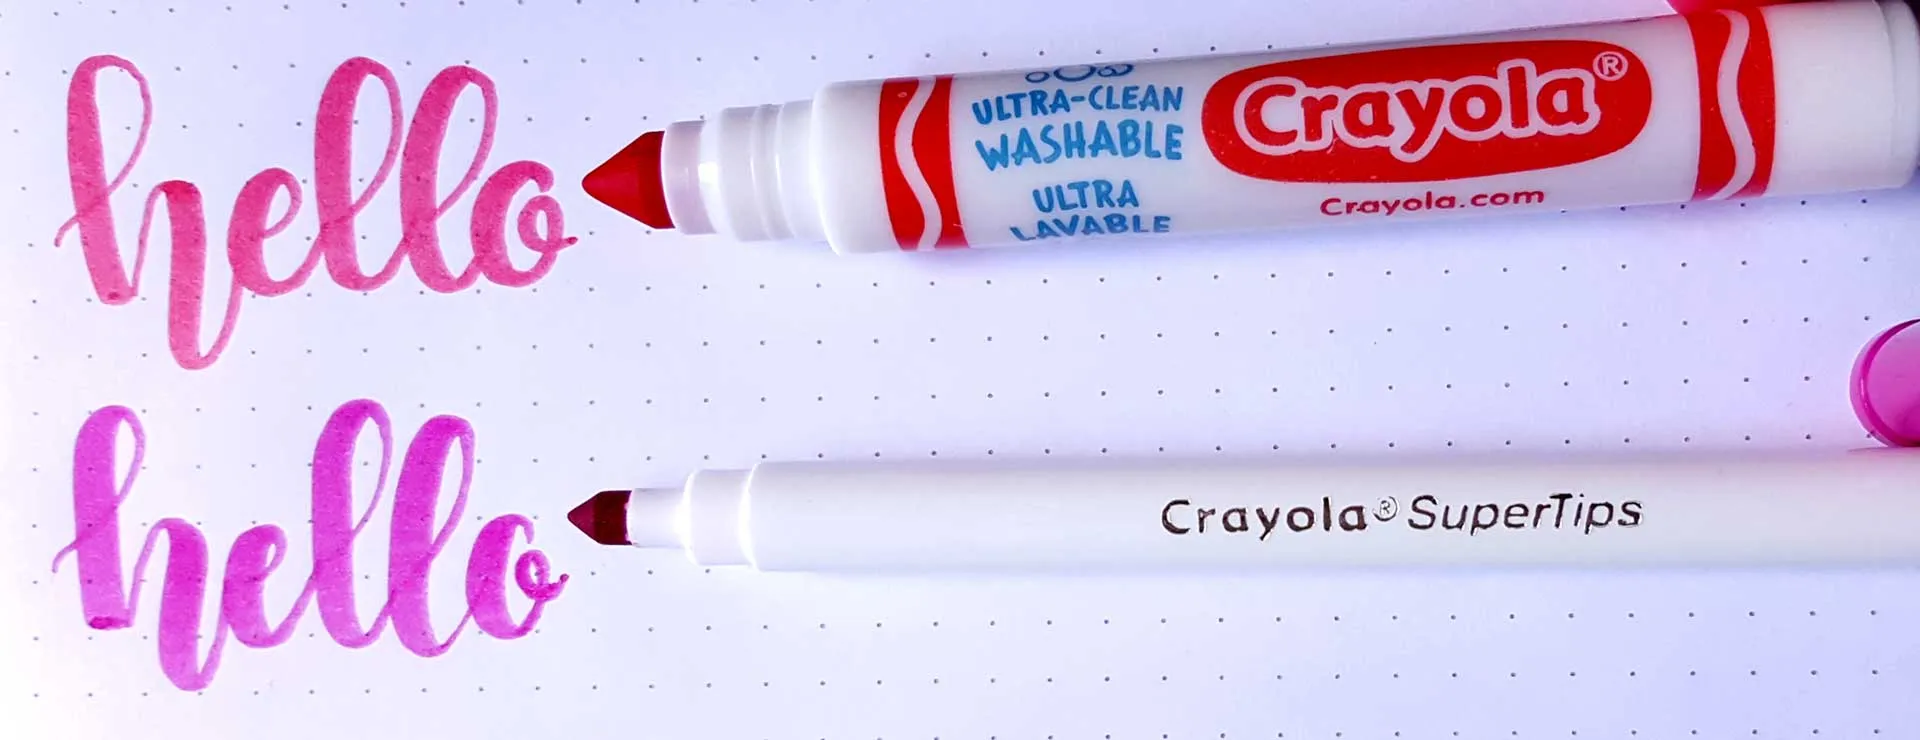
Honorable Mention: CrayolaAnother tool I want to mention are Crayola Markers. They are not your typical brush lettering supply and we don’t get them in Switzerland (one lovely lady called Chelle (@the_lemonade_store) was kind enough to send me a huge variety over from the US) but they are inexpensive and they work. You should give these a try if you can. I did some lettering with a washable marker and one of the supertips below. Crayola shaped pens do have a separate learning curve, as you can see I am still working on that :D
(If you happen to have an iPad Pro and want to get into lettering, that would also be a great tool, but Obviously you could buy all of the pens talked about in this post and would still spend a lot less money than on an iPad. But just saying. Check my blog if you want more on that topic)
And that concludes my starter kit. If you tried any of the products don’t like any, agree or disagree with the list, let me know in the comments below. :)