When I first started creating responsive Websites, navigation was always one of the hardest things to accomplish. Because of that, I almost always went with Bootstrap. But using a pretty huge framework for something pretty small like a menu pretty soon started bothering me. So I searched for tutorials on how to write a responsive menu and soon started, to write my own, because there was almost always something that I did not like.
For all of you out there that are in the same position I was, when I started, I created this menu. It is a three level navigation, that will be generated from a simple link list.
In this Tutorial I don’t want to go over how this menu works, but how to integrate it into the blog (I do plan on writing a tutorial on the dropdown, though).
It is always best to test something new in a testblog, before you put it on your live blog, even though this should work out in most cases at the first try. Also, since this is a responsive menu, you should use a responsive template. If you don’t have one and don’t feel like writing your own, you are very welcome to take a look at some of my templates.
Okay, log into blogger and let’s get started.
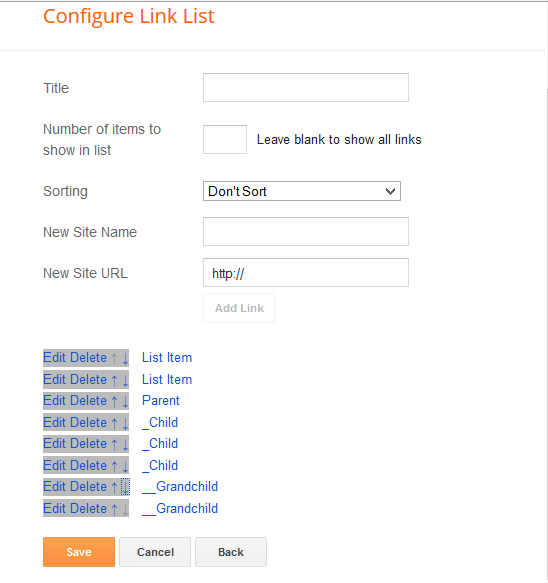
1. Create Linklist
1. Create LinklistFirst open the layout tab of your blog and create a new link list. It does not matter where you put it, since the navigation will be fixed anyways. But because I’d like to mention some logic, I would place it somewhere around the top.
Now on how you build your link list. Order does matter here.
Subelements for the second level start with an _and elements of the third level, start with two underscores __ For the correct order, you need to put the grandchildren underneath the children and the children below the parent.
1 parentlink2 _childlink3 __grandchildlinkSave.
2. Sass and Script Personalization.
2. Sass and Script Personalization.Now personalize the dropdown.
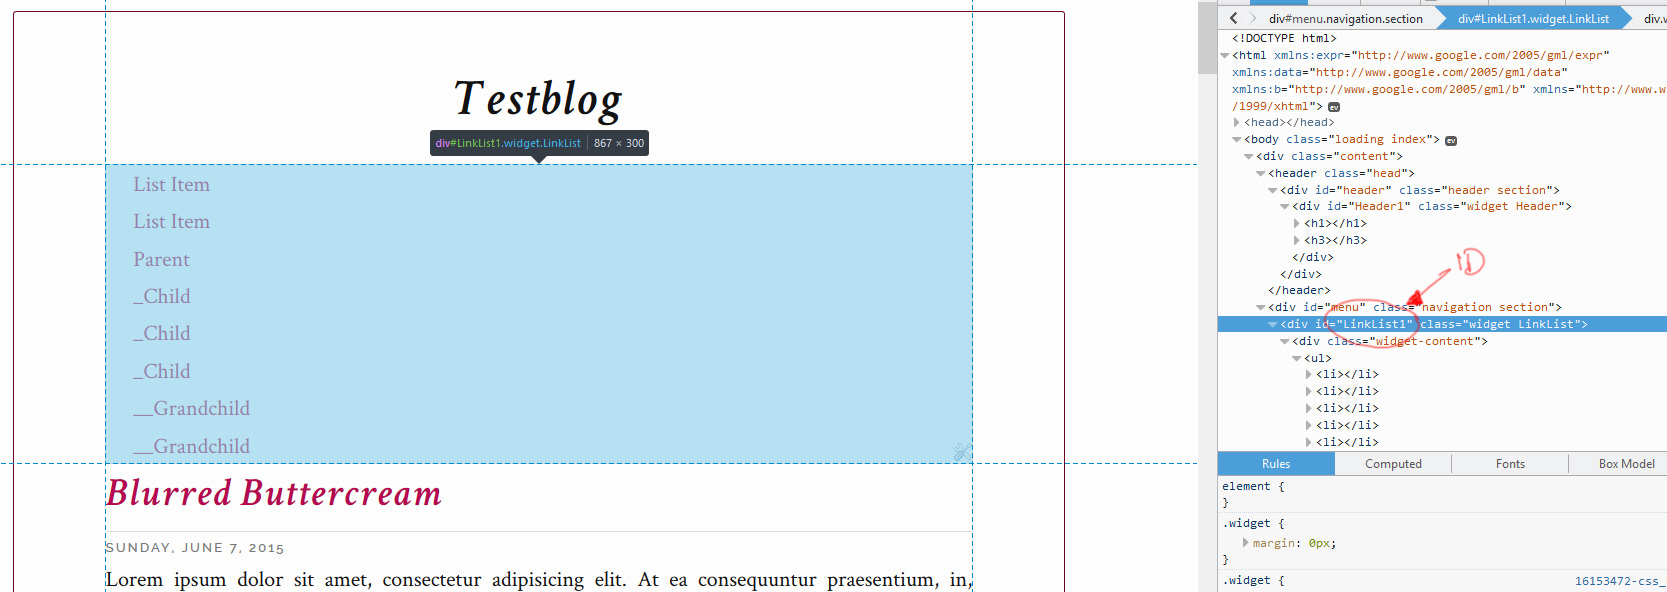
The first thing you want to find out though is how the list is called.
So you want to inspect the element with the inspector that ships with every good browser. (right-click, inspect element).
If you just have one linklist within your blog, you can work with the class. But since the linklist widget is pretty popular, and you don’t want to cause any confusion, it is easiest to work with the ID.
So go check it out. For me the Id is LinkList1
YOu don’t have to make any changes within my javascript, if you want to use my CSS and are happy with the way I’ve named the classes. But there are two variables, you should/can customize.
Search for
1 // SETTINGS2 //------------------------------------------------------3 var one_level_list_element = $('ul'), // mandatory!4 menu_name = 'Menu', // this will be used next to the hamburger icon for the toggle ButtonYou should replace the first $('ul) with the correct identifier of your linklist. The second variable is how you want the button to be called in the responsive view. In the example I wanted to change that to “Navigation” So after my changes are done, that’s how it looks like:
1 // SETTINGS2 //------------------------------------------------------3 var one_level_list_element = $('#LinkList1 ul'), // mandatory!4 menu_name = 'Navigation', // this will be used next to the hamburger icon for the toggle ButtonSince the styles are written in Sass, it is very easy to customize. I did explain all of the variables, so it should be easy to adjust.
1    // Menu Collapse, change to something above viewport width to see responsive version2    $toggle: 700px;3
4    // Main Bar Background Color5    $menu_bg: #B50A50;6
7    // Link Color and Hover8    $menu_color: white;9    $item_hover_color: lighten($menu_bg, 75%);10
11    // Drop Down Opener (Arrow Links)12    $arrow_toggle_line: 1px solid rgba(white, .1);13    $arrow_toggle_hover_bg: rgba(white, .1);14    $arrow_toggle_color: white;15
16    // Level Two Background and Background on hover17    $level-two_bg: $menu_bg;18    $level-two_hover_bg: rgba(white, .1);19
20    // Level Three Background and Background on hover21    $level-three_bg: $menu_bg;22    $level-three_hover_bg: rgba(white, .1);23
24    // Menu Text Alignment use[left, center, right]25    $text_align: left;26
27    // Responsive Toggle Link28    $responsive_width: 100%;29    $responsive_toggle_text_align: left;30    $navtoggle_bg: #291018;31    $navtoggle_color: white;32    $navtoggle_hover_color: lighten(#291018, 80%);
As soon as you adjusted the colors, you are ready to put together your HTML widget.
3. Add HTML Widget
3. Add HTML WidgetOkay, what is all going into the widget?
The menu depends on Font Awesome Icons, so that’s what I’ll add in there as well. And because the js was written in jQuery, you want to make sure, that that’s added as well. If it is already part of your blog, you don’t need to add it again, though.
I just put everything in a HTML widget, but if you are not afraid of your code, feel free to add it in the respective places within the template.
Copy all of the javascript. For the CSS, you click on view compiled and get the generated CSS. Then look for:
1 /* Copy Everything Below This Line */And copy everything below that line, as per instructions.
An that’s the content of your HTML widget.
1    <!-- Font Awesome -->2    <link rel="stylesheet" href="//maxcdn.bootstrapcdn.com/font-awesome/4.3.0/css/font-awesome.min.css">3    <style>4        /* Add CSS here */5    </style>6
7    <!--jQuery-->8    <script src="https://ajax.googleapis.com/ajax/libs/jquery/1.11.2/jquery.min.js"></script>9    <script>10        // and javascript here11    </script>
4. Troubleshoot
4. TroubleshootSometimes Blogger likes to be annoying.
If something does not work out as expected, it might be because the CSS of the widget is interfering with the new CSS:
In that case take your ID of the linklist again and add one more line at the end of the script.
1        // add this height as a margin to the body, so that the menu won't cover everything up.2        $('body').css('margin-top', menuheight + 10)3
4        // below this comment is the new line5        $('#LinkList2').toggleClass('widget', '');6    });
And then it should work. Of course you could just overwrite the styles, but removing the class altogether often seems the cleaner and faster solution.