I left Etsy about a year ago and I haven’t looked back ever since. However, after leaving, setting up the new shop was no easy task, even though I am a web developer by trade and have set up quite a bit of WooCommerce shops during my day job. But – I had set out to write the full theme myself, even though I am not a Backend person and PHP and I do not get along to well, and also I didn’t want to use any premium plugins (because I am greedy and obviously like to take more pride in my abilities than I sometimes should), did I manage to get all of my things set up how I wanted them without any premium plugins? Did I almost go crazy while tackling that? Was it oh so worth it in the end? Hell, yeah! So let’s look at how I did it.
Table of Contents
Table of Contents- What fueled this post?
- Why WooCommerce
- What does a WooCommerce Shop cost?
- How I set up my WooCommerce Shop
What fueled this post?
What fueled this post?So this post is happening for a reason on this blog of mine, that has mostly shifted to be an expression of my love for Calligraphy and Lettering, the reason is – once again – Etsy. I don’t think I have ever written about the reasons why I left, so I will give you a short rundown here. Etsy is expensive in terms of fees, but that was not the reason why I left. Over 3 months before I left, Etsy decided to switch their payment processor in Europe and did not inform anyone. So one day I got an email stating that my Bank Information was wrong and no payment were able to go through. I promptly sent Etsy an E-Mail because none of my Info had changed. After a couple messages back and forth (each message from them being answered by me within at least two days and each reply from them taking at least two weeks) I found out that their processor had changed. I was asked to check with my bank multiple times. I called Etsy, and was asked by the person on the phone to resend an email which stayed unanswered for three more weeks. After that I had enough, I was very close to getting a lawyer involved because I had not received payments for months at that point and had closed the shop because I was not going to let them make money off of me with the fees with them freezing all of my profit. So after the legal talk someone finally replied informing me that I neither had to add the “Account Number” written on my bank statement nor the IBAN from my account but the last X characters from my IBAN which would give me the correct format. I had talked to 4 people before that, none of those could give me this information, which in my opinion, does 100% belong on the settings page as an explanation how to correctly input the information. I have never seen a format like that and also – what caused this whole drama was 3 freaking zeros. I did end up getting my payout but after that I 100% knew that a company that gave not even the slightest shit about their sellers was not a company I wanted to support. Imagine if I was someone living off of my shop profit, imagine if I had to pay rent from that money. No one gave me significant help for months. Also they send at least one email per day with the most useless tips ever but didn’t even bother informing the people affected that another company would be handling their payments. Not okay. So long story short; I never recommend using Etsy to anyone anymore. And whenever I find something on Etsy I will make sure to check if the store owner also sells on another platform because I try to avoid them. So that happened months ago. Now just very recently, there has been quite the outrage because Etsy decided not only to raise their already outrageous fees, they also extended those fees to include shipping. (“Keep in mind that payment processing fees are taken from the item’s total sale price, including its shipping fees and any applicable sales tax.” – Seller Fees for Etsy Payments) In other words, Etsy takes a percentage of the shipping cost, which is already a huge annoyance as a seller and a buyer so for Etsy to take money on that is terrible. It means that Etsy Sellers will now have to take that percentage into account and charge you more than what the post office charges just so they are not losing money. So now a lot of people are looking into other options and today I want to present you with the one that I went with. (PayPal and Stripe, the processors I will be talking about do also charge on shipping, but Etsy didn’t used to and Etsy Fees are significantly higher, more below)
Why WooCommerce
Why WooCommerceSo there are a couple alternatives to WooCommerce which are probably easier to setup for certain people. I know Squarespace and Shopify are two very popular options. The attractive thing about Shopify being that it does integrate quite nicely with Instagram and allows you to create shoppable links. However, if you are into blogging, chances are you are already using a WordPress site. If not, WordPress is a great system to get into blogging at a later point. Also WordPress is an OpenSource Content Management System, which means it can be installed on whatever server you like. That is especially useful if you are outside of the US and would like to use a server that is in the same country that you are (which is probably the best choice because it means the hosting company falls under the same laws as you do).
WordPress and WooCommerce also come with an abundance of plugins and Themes because they are OpenSource, and you do have full control over your code which just gives you more freedom.
What does a WooCommerce Shop cost?
What does a WooCommerce Shop cost?General Site Cost
General Site CostSo the System you use to manage the shop is free, however you need to run WordPress on a server, since it is a shop, you do want to have an SSL certificate for security and also you do need a domain so that people can access your site.
- System (WooCommerce & WordPress) Free
- Hosting ~ $10-20/month
- Domain ~ $20/year
Obviously prices vary in every country but when you are dealing with a shop I would most definitely do research on your hosting provider, make sure they’re not shady and that they are a known name. THey will ensure their servers are secure and usually those companies have a lot better support, so especially if you are not a techie, make sure you get good people to help you out.
Fees
FeesLet’s talk about payment fees, because yes you do still have fees.
So there are different payment gateways that can be integrated with WooCommerce, they do have a whole list here. I personally use PayPal and Stripe which are the most common ones requested here in Switzerland whenever I have set up a shop for clients, I don’t know how the rest of the world works but with my mostly European and American Audience this has been working well for me.
So the fees are different in every country as far as I am aware and if you google Paypal Fees and or Stripe Fees you should see the breakdown of the numbers yourself. Generally the important thing to note is in my opinion that both PayPal and Stripe will reduce their fees on high volume transactions, which Etsy does not. So especially if you are making a living off of Etsy it will most definitely be cheaper to use a WooCommerce shop.
There is no Fee to create a Shop Listing and your listings will not expire. Also you will not be getting a bill at the end, but the fees are automatically processed during the payment process. So you will be seeing the money that you earned directly. Paypal will store the money for you and you do need to manually transfer it to your bank account, whereas Stripe will transmit your earnings after a short period of time to your bank directly. I personally prefer Stripe, but I do notice that a lot more people use PayPal to pay because it just seems more convenient.
So I just wanted to create a short breakdown of the fees as they are from a Swiss Perspective for you to compare (note that the listing fee will not update into CHF even if you change the settings, so it is 100% subject to Etsys Currency Conversion. I’m assuming 1:1 in this case just to make it a bit easier)
These are the numbers as of Jul 4th 2018, they may not be accurate at time of viewing
| Desc | Etsy | WooCommerce + PayPal | WooCommerce + Stripe |
|---|---|---|---|
| Creating a Listing | $0.20 USD | 0.00 CHF | 0.00 CHF |
| Renewing a Listing (happens after every Sale of the Item) | $0.20 USD | 0.00 CHF | 0.00 CHF |
| Flat Fee per Order | 0.50 CHF | 0.55 CHF | 0.30 CHF |
| % of total Price per order | 4% | 3.4% | 2.9% |
So I do understand the Listing Fee at first, it is definitely less than the $10 you pay for hosting on your own site, but having the renewal fee every time brings the total of fixed fees to almost a full Dollar, which is crazy.
One of the things not incorporated into all of this is conversions. I decided to give people the option to pay in USD, EUR and CHF because I know how frustrating it can be to have to pay in a foreign currency. The Plugin I use to offer multiple currency support does have the option of switching to the main currency at checkout, which will charge the person in CHF in the end and which would make the number you see the exact numbers. But because I feel like that would result in terrible customer experience I have that disabled and the payments are mostly made in foreign currencies. Stripe will automatically convert to CHF and then take the fees, PayPal charges additional fees on cross-country transfers but I am okay with that because I still never pay as much as I did with Etsy.
One of the things that is very important to note – I have done a bit of googling and have thought about charging a couple cents more for PayPal because as a seller it reduces the profit and creates more work because I have to manually transfer money. Adding an extra fee based on the payment method is very easy to achieve programmatically but this is in violation of the User Agreement with PayPal.
You agree that you will not impose a surcharge or any other fee for accepting PayPal as a payment method. You may charge a handling fee in connection with the sale of goods or services as long as the handling fee does not operate as a surcharge and is not higher than the handling fee you charge for non-PayPal transactions.
Source
So please be aware of that. Also I have been charged a surcharge for PayPal before as a shopper and it is just so annoying. If you are bothered by fees, raise your prices. Simple as that. And always remember that Fees are tax-deductible.
How I set up my WooCommerce Shop
How I set up my WooCommerce ShopOkay, I would love to get into a lot of detail in here but I feel like there is a plethora of tutorials out there on how to install and setup a WordPress and WooCommerce website and I highly recommend giving it a google and choosing the one that speaks to you most. I really just want to talk about all of the features I implemented and how I solved certain problems that I found hard to find on the internet.
Before you begin
Before you beginMake sure you have the following stuff up and running before working on anything I talk about
- WordPress installed
- WooCommerce-Capable Theme installed
- WooCommerce installed and running with basic functionality
Features I will be talking about
Features I will be talking aboutSo what does my Shop feature and what will I be talking about
- Offering Free Downloads without people having to fill out information
- Accepting multiple Currencies
- Having a Sale
- Automatic Discounts
- Setting up “Complex” Shipping Scenarios
Offering Free Downloads without people having to fill out information
Offering Free Downloads without people having to fill out informationOne of the first things I wanted was combine my Freebies Offering with the Shop. Freebies had been on my site before I switched to using WordPress (I used jekyll before, yay for nerdy static site generators!) and then I always had download links which had a number tracker so I knew how many times people downloaded a brush. When I created my first free Listing in WooCommerce though I realized that in order for a person to get to the download link they needed to give me all the information. I don’t do anything with the personal information I collect from orders and I sure as hell despise it, when I need to enter info to get a free file and then end up getting annoying emails all the time (has happened more than once…) so I wanted to be able to setup my product in WooCommerce and then have people download directly.
So I went in search of a plugin and I found one. Free, of course. Free Downloads WooCommerce is a very simple App that will create Download Buttons on free items so that people don’t have to log in, and it also will keep track of how many times a file has been downloaded, so you know which are the most popular freebies and can act based on that.
So that fixed my main problem. One of the main problems I then had, however, was that I wanted to have a shop page and a freebies page and I did not want my Freebies to show up in the Shop because I do have a lot of freebies and I just felt like they would overpower the shop – and well, that Shop finances my whole blog and Instagram where I review all of the art supplies, so I needed the Shop Items to get enough attention.
So I decided to rewrite the Shop Loop. If you are not a programmer, you might want to google for a plugin before changing code, and if you are brave enough to do code changes when inexperienced, always make a backup and never change actual theme files but use a child theme.
I gave all of my freebies the Freebies Category. Then added the following Code to my functions.php file
1/* Exclude Freebies from shop page2 *---------------------------------3 * removes category slug from the shop page4 */5add_action( 'pre_get_posts', 'remove_cat_from_shop_loop' );6
7function remove_cat_from_shop_loop( $q ) {8
9    if ( ! $q->is_main_query() ) return;10    if ( ! $q->is_post_type_archive() ) return;11
12    if ( ! is_admin() && is_shop() ) {13        $q->set( 'tax_query', array(array(14            'taxonomy' => 'product_cat',15            'field' => 'slug',16            'terms' => array( 'freebies' ), // Change it to the slug you want to hide17            'operator' => 'NOT IN'18        )));19    }20    remove_action( 'pre_get_posts', 'remove_cat_from_shop_loop' );21}
We’re basically just hooking into the post collector function before the shop loop is generated and removing the freebies Category from it. So before the loop is populated, all of the posts are collected. We are preventing the category posts from being added to that collection. Super simple.
Accepting multiple currencies
Accepting multiple currenciesBecause I wanted to offer my customers to offer the option of paying either in USD or EUR in addition to my home currency CHF, I looked into many different options for currency switchers. I only needed two additional currencies so I knew that a free plugin would do. However I really wanted a plugin that allowed for automatic currency conversion based on an online source. I didn’t want to add it manually.
So after a lot of searching I ended up going with Currency Switcher for WooCommerce The Plugin Page also documents the Settings very well. One of the biggest issues I had faced when trying to find good plugins for free was finding some that were well enough documented that I was able to set it up so that it worked how I wanted it to.
The same Developer also offers the Booster for WooCommerce Plugin which has a TON of additional features, stuff like Bookings, Open Pricing, etc. It also comes with a Currency Switcher but the free Version of Booster has more limited settings than their free Currency Switcher, so I ended up using the Separate Currency Switcher and using Booster for the Reporting. The non-WooCommerce Currency Switcher messes up the default reports. So WooCommerce by itself will just count the sales made in your default currency.
The Booster Reports Module will fix that issue. It is also the only Module I have currently active in this Toolbox (it comes with 100+ modules) I haven’t looked at them all but this will most definitely fulfill a lot of needs. I only recently discovered this, so I set all of the rest up before I even looked if Booster had another option. But I am happy with my setup, so right now I have no plans of incorporating more tools into it.
Having a Sale
Having a SaleI love Sales and having Flash Sales. WooCommerce does offer a Sale Option for every item but having a sitewide Sale on everything is sometimes what we want, and also having it turn on from a time and then turn off.
The Plugin I use for that is Finale – WooCommerce Sales Countdown Timer & Discount Plugin Lite it is a great App that allows you to create “Campaigns” so you can plan out Sales. Stuff like Black Friday or Cyber Week can be planned out. They can be recurring, or one time. They can be Fixed Price Discounts or Percentages.
This App has been perfect for all of those Big Sales that happen once or twice a year. Also it comes with a countdown that I weirdly enjoy.
Automatic Discounts
Automatic DiscountsOkay, so one of the things I did back when I had my Etsy Store was sell my brushes in Sets, where I had a fixed Discount amount in my pricing table, but the problem with that was that this reduced the freedom. I really just wanted people to put the sets together themselves. The easiest way for me to do this was programmatically. I did actually write a whole blogpost on how I created my Mass Discounts, so Read that here if you want to learn more.
Setting up “Complex” Shipping Scenarios
Setting up “Complex” Shipping ScenariosOkay, so this literally drove me crazy, which is why I will go over this in quite a bit of detail. The way shipping is handled in WooCommerce looks very simple at first and I was sure that I needed a plugin to make my “complex” scenario work. But after a lot of research and trying to find my inner logical self I managed to figure it all out with the default.
So let me run you through the shipping rules I have and how I made them work. Generally I sell two types of physical items. Number one being Wax Seals, which are shipped by GetMarked from the US directly and Number Two my Stickers, which are shipped by me from Switzerland.
The Shipping Table for the Wax Seals is very much using an Etsy Fashion
| Shipping Cost for one order | Shipping cost for each additional order | Destinations | Carrier |
|---|---|---|---|
| 3.5 | 1.5 | US | USPS First Class Mail |
| 10 | 2 | Canada | Canada Post Expedited Parcel |
| 13 | 3 | UK | DHL eCommerce |
| 15 | 4 | Others | DHL eCommerce |
The Table for my Stickers is a lot simpler, Swiss Post basically has just 3 shipping Zones and for simple letters 3 different price ranges.
| Destination | Swiss Post Economy Price | Swiss Post Priority Price | Swiss Post Registered |
|---|---|---|---|
| Switzerland & Liechtenstein | 0.85 | 1 | 5.3 |
| Europe | 1.4 | 1.5 | 7.5 |
| Rest of The World | 1.7 | 2 | 8 |
So how on earth would I combine all of those.
The first issue was setting up the Shipping Zones.
I needed USA, Europe, Canada, UK, Switzerland, Liechtenstein, Rest of the World each in their own Zone. The biggest Problem was the fact that the Europe Region contains the UK, Switzerland and Liechtenstein so whenever I would set up a Europe Zone the Shipping of that Zone would be used instead of the respective Country Zone. So I took a minute of calming myself down and then created a Zone where I selected every single freaking country in the Europe Region except for UK, Liechtenstein and Switzerland, and that gave me my Zones.
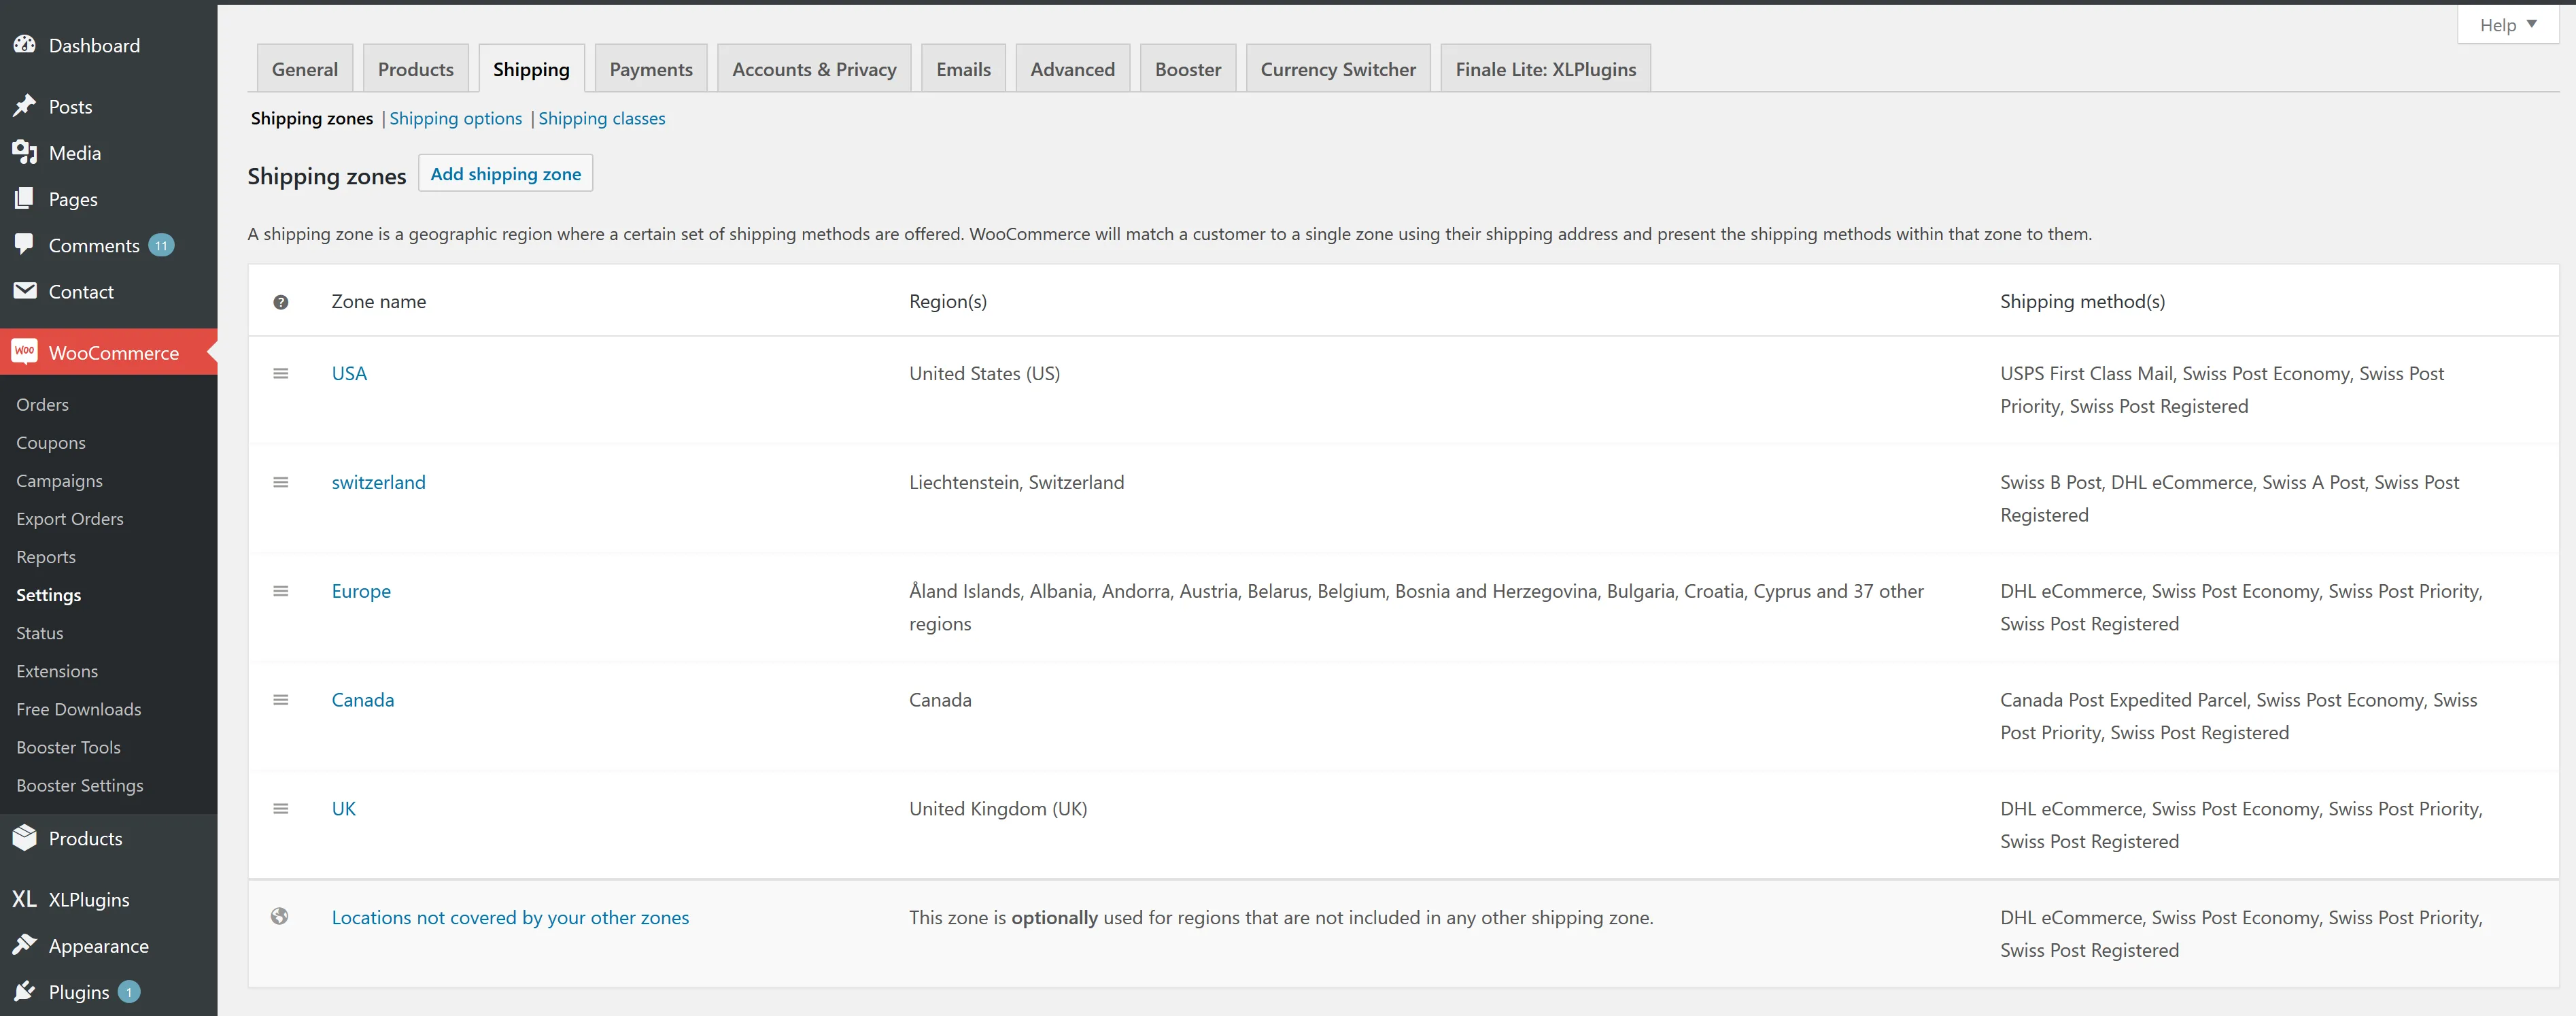
That meant that I would have to repeat some of my shipping options (Switzerland & the EU & Others would all get the DHLeCommerce for the Wax seals) same for UK and EU, and US, Canada and Others for the Swiss Shipping options. But I am fine with that since shipping costs usually don’t change that often and I am okay with having to adjust it in 3 zones if I can save $100 for a premium plugin.
Okay, how would I now prevent the swiss shipping from showing up on checkout during a Seal Sale and how would I get rid of the Seal Shipping Options when people were buying stickers? Shipping Classes. In the Shipping Classes Setting I created two different shipping classes, one for Seals and one for Stickers.
Then on each product in the Product Data Settings under the Shipping Tab I added the respective shipping class.
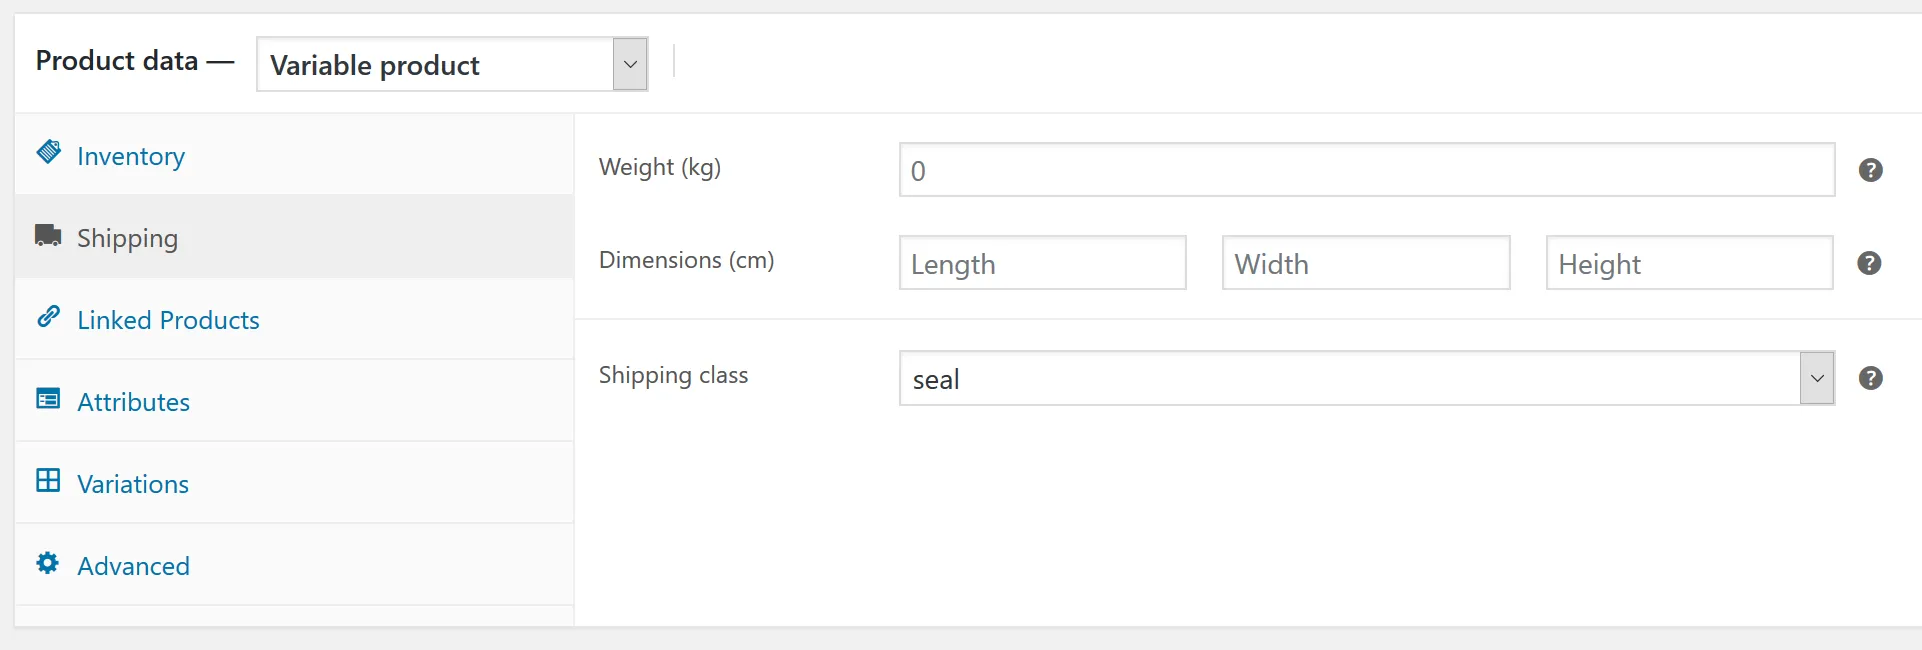
Then it was pretty easy.
Editing the Shipping Zones, I added Flatrate Shippings for all of my options.
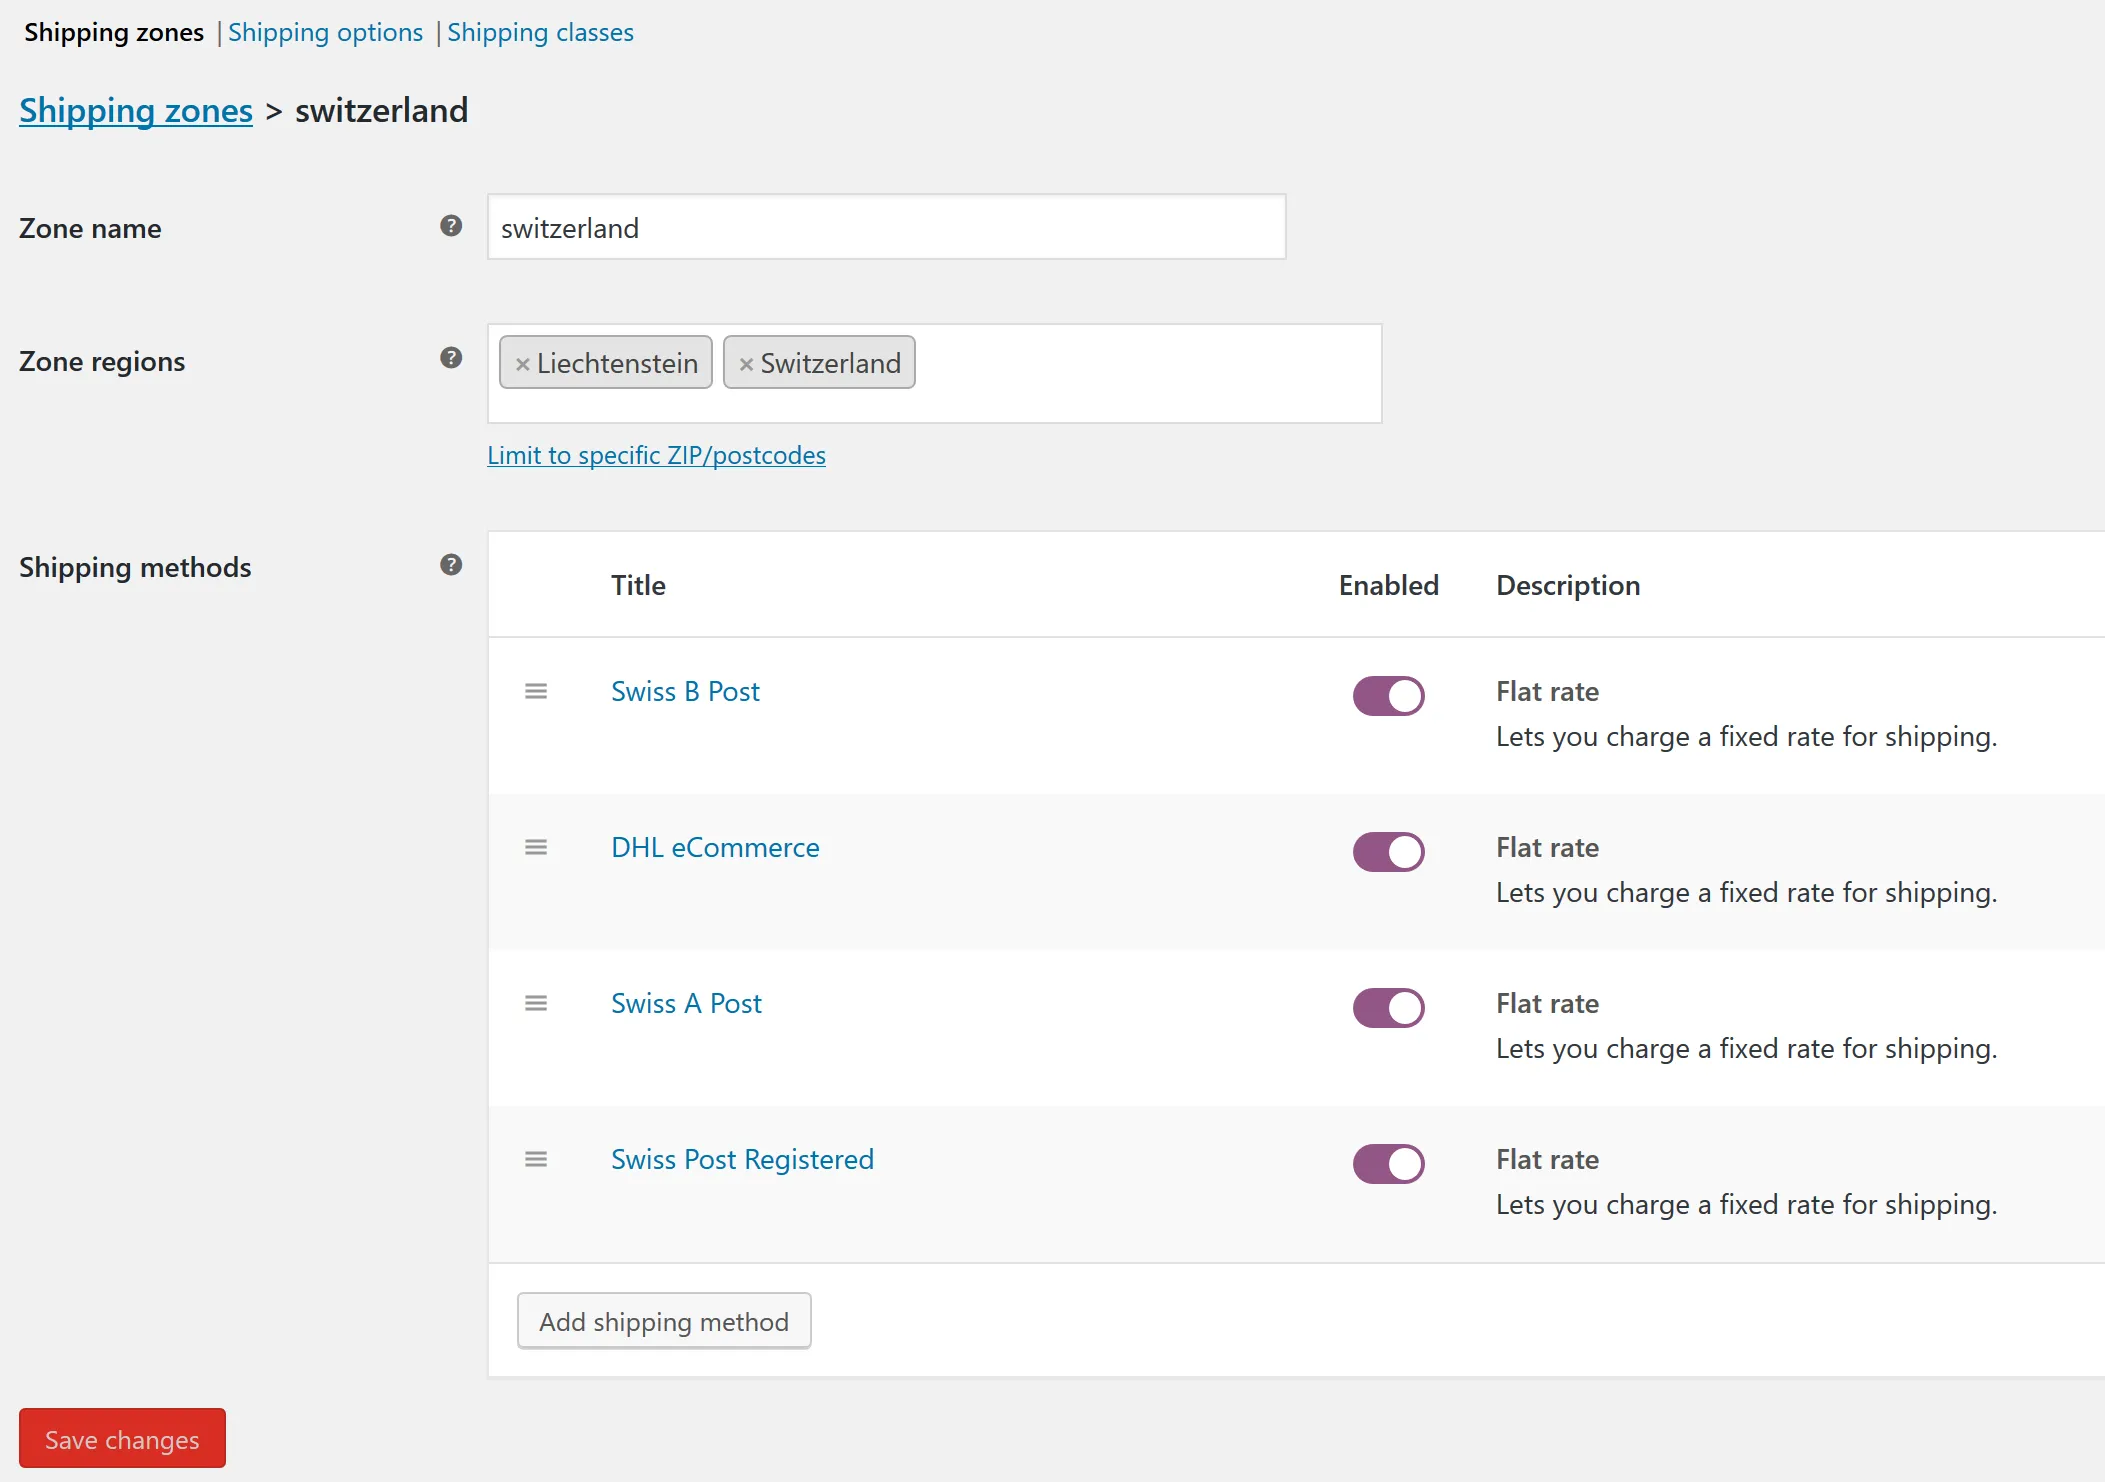
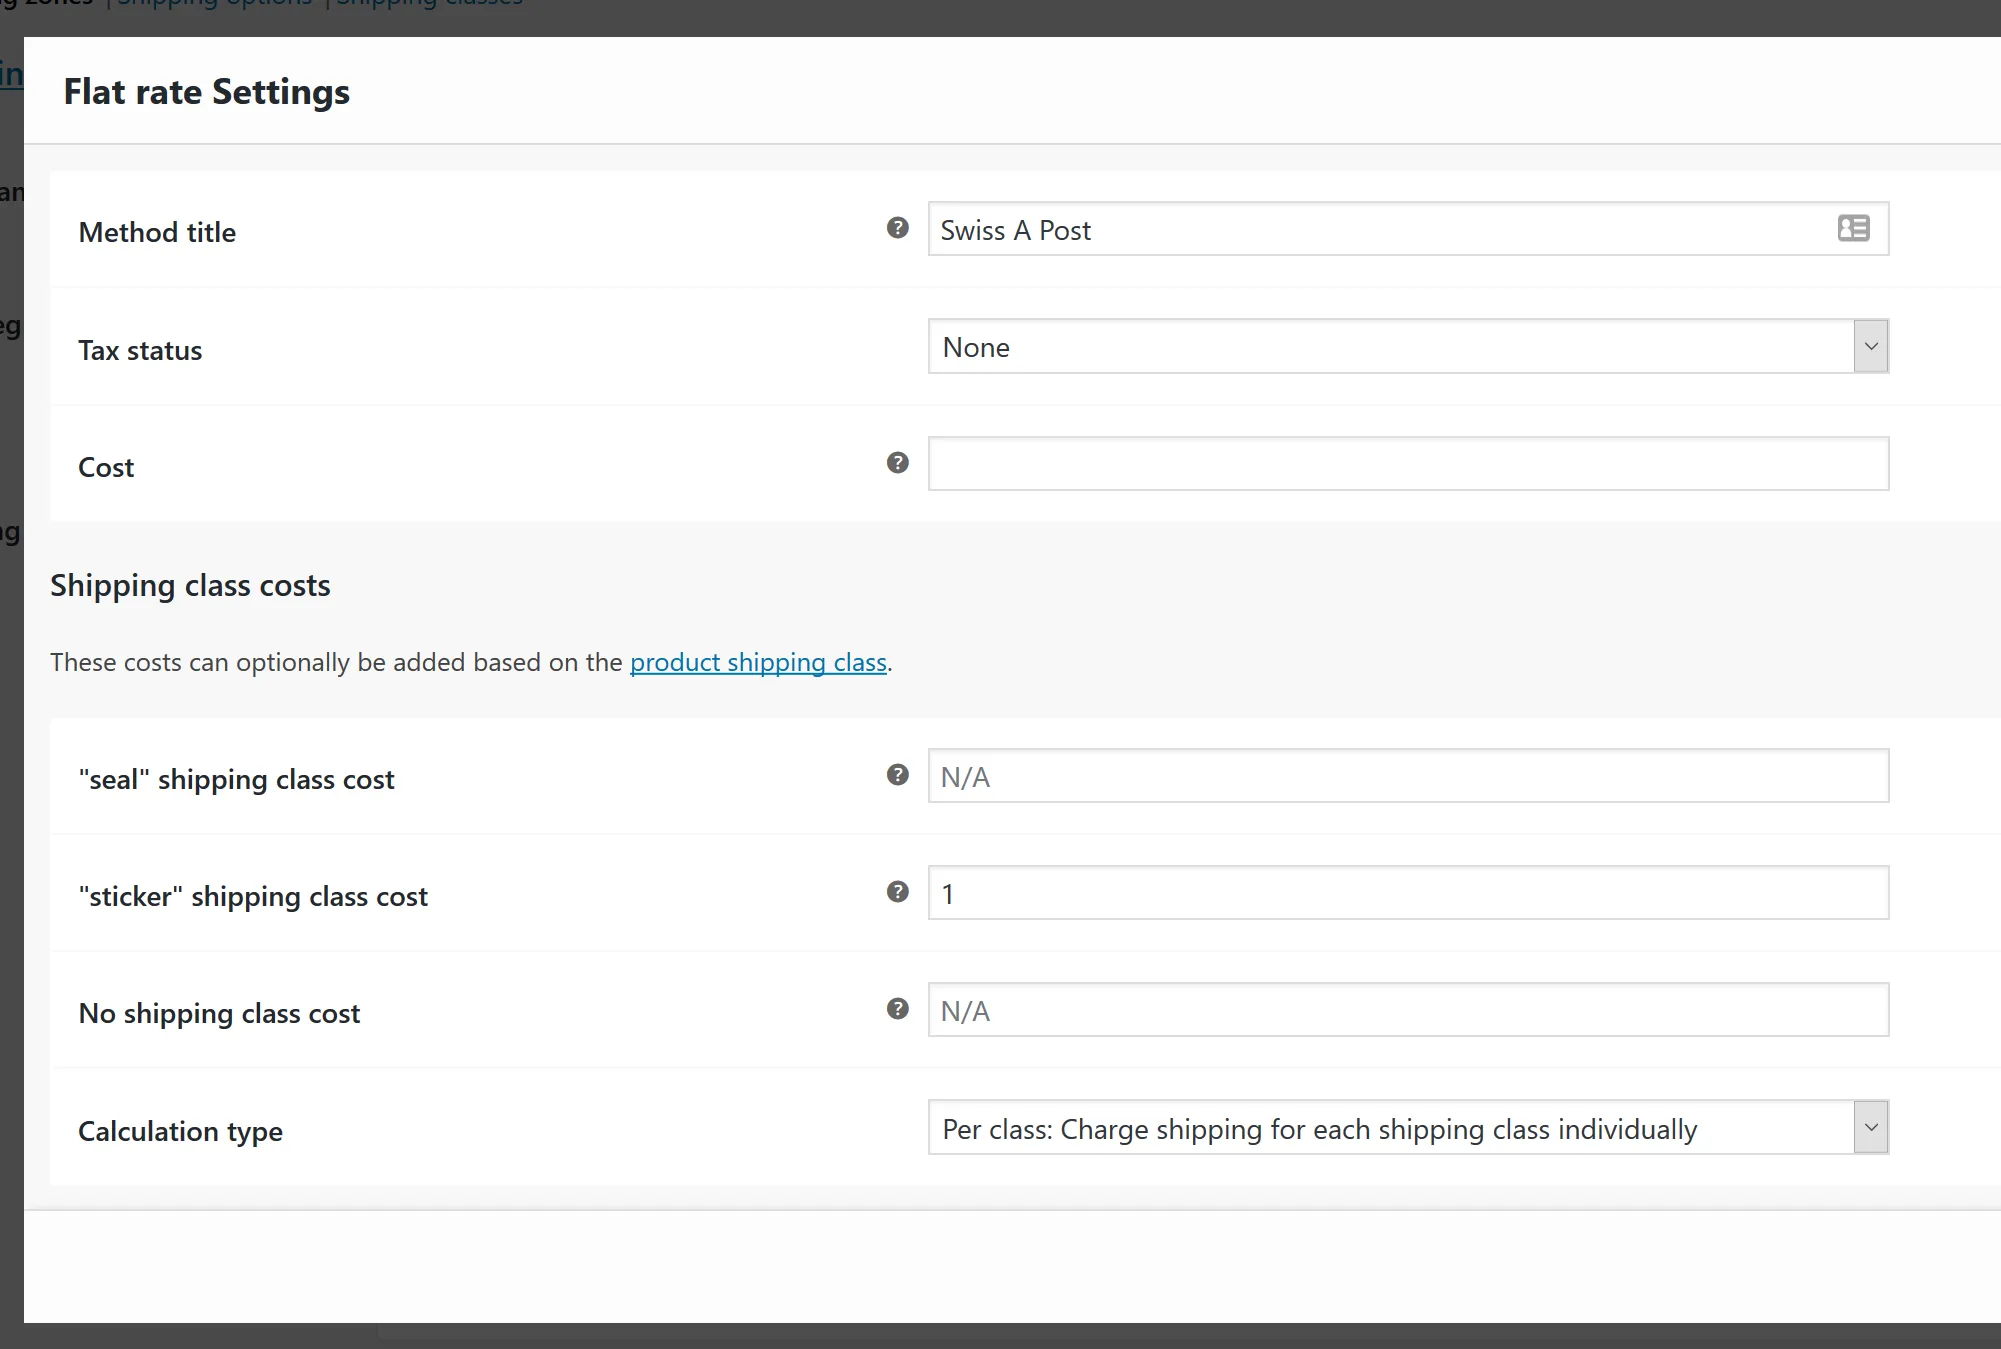
Instead of adding my shipping price in the Cost Field, I only added a number in the respective class. Leaving the fields for the other class empty so it would not show up when items of the other class were in the cart.
Because my items are shipped from two different places I cannot combine shipping, thus it is important, that the Calculation type is set up Per Class, so if Items of both classes are bought, both shipping methods will show up and be charged.
Okay, so that’s easy. But how to handle the formulas from the seals?
Basically WooCommerce allows you to create super minimal logic within the number field. So all we need to do is figure out a simple formula to descripe shipping cost.
Basically we have a base cost and then a cost for additional items.
In the example of the international shipping our price for 1 item is 15, additional items are 4 each. Now WooCommerce allows us to use [qty] within our formula.
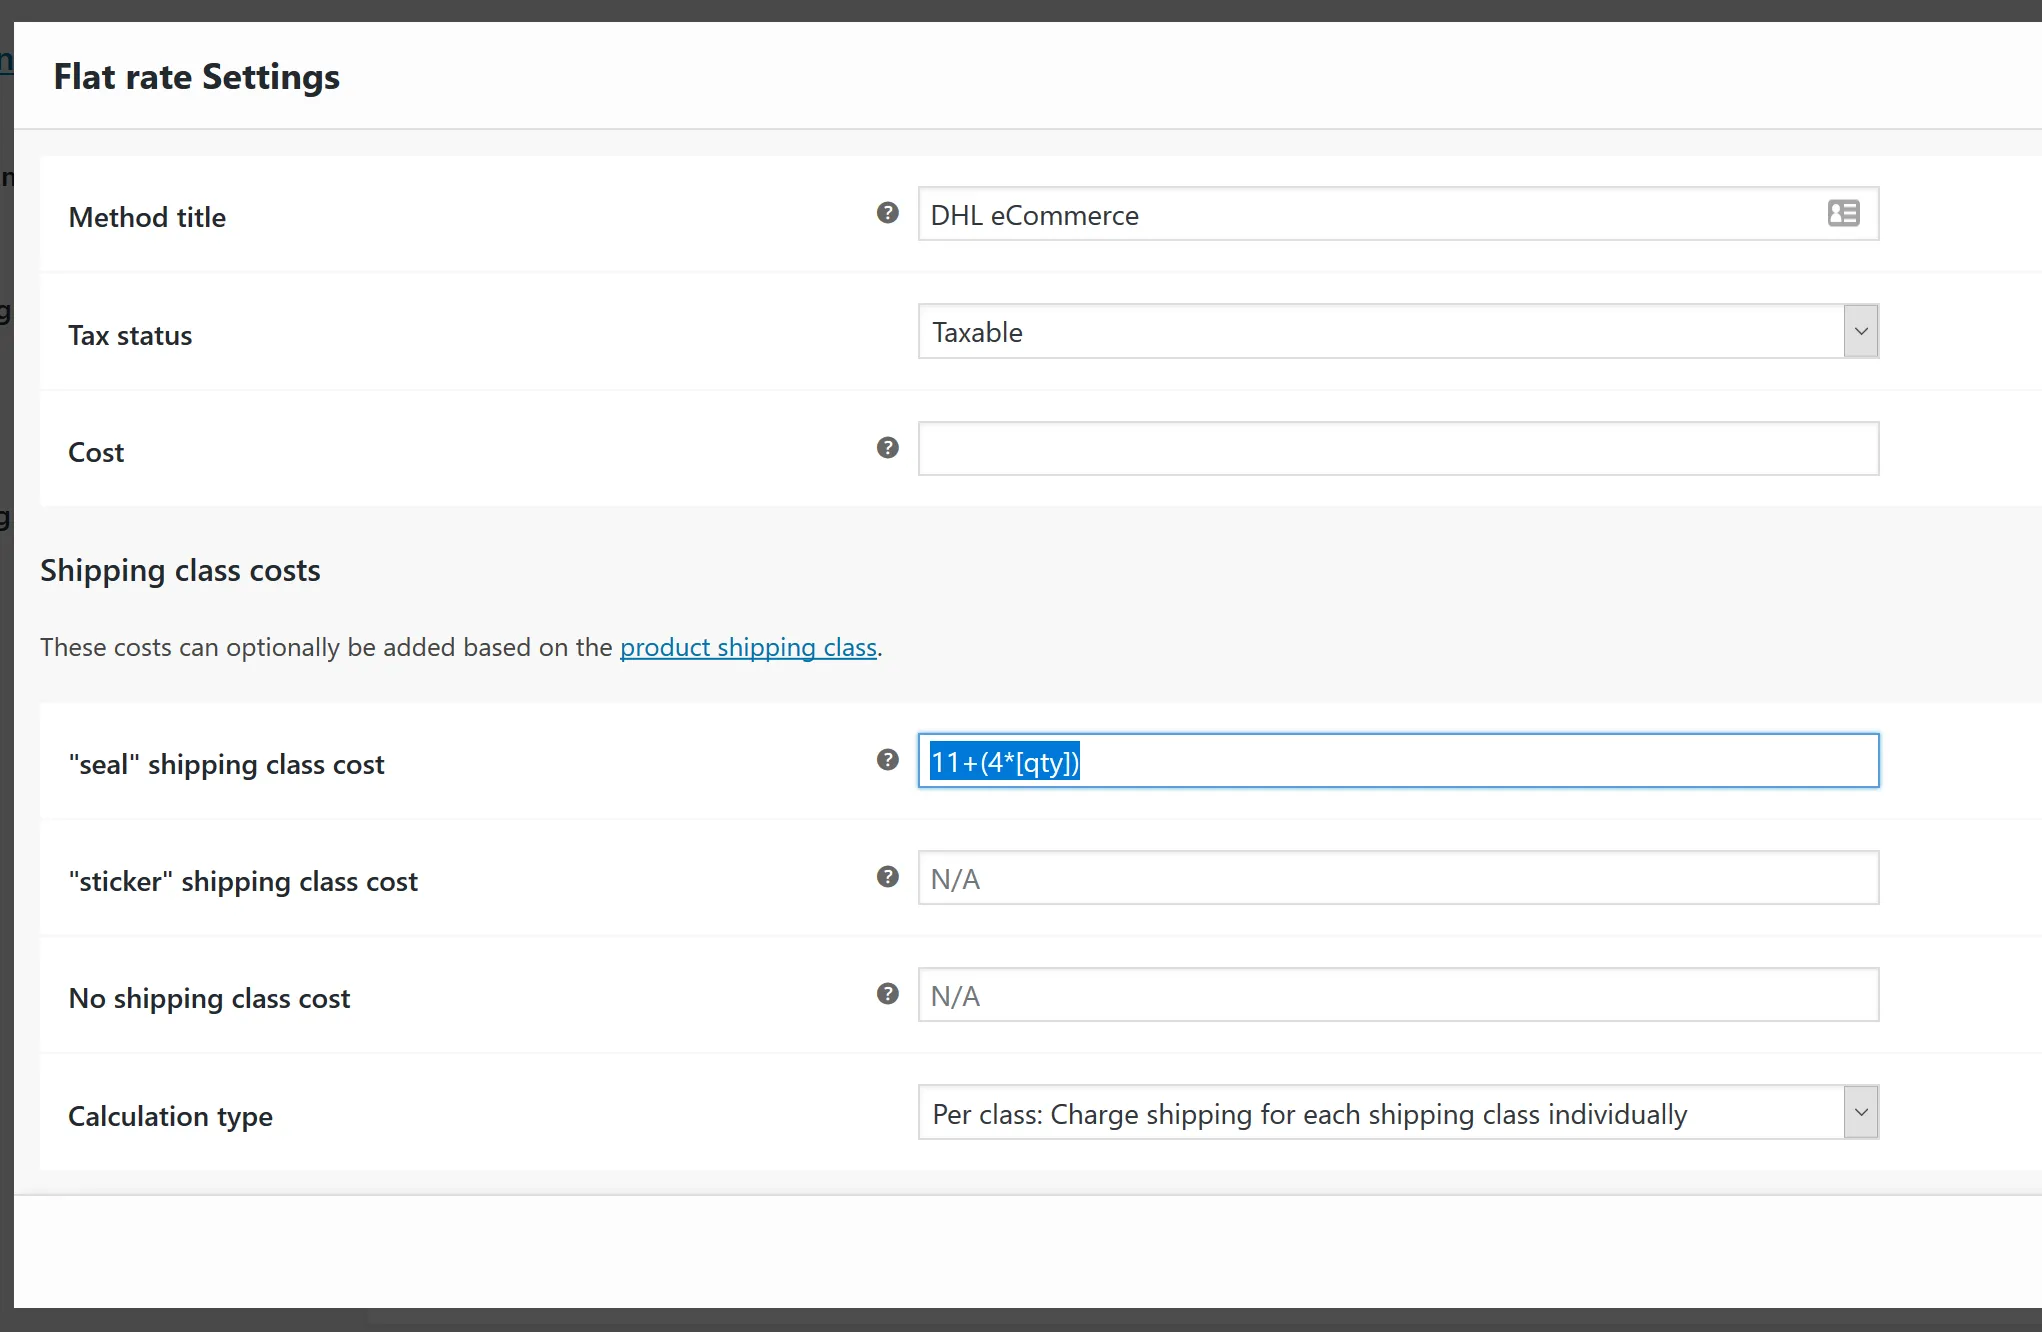
And that’s really all there is to it.
If you have any more questions please feel free to contact me.